How to Receive and Upload Files with a Web Form

Whether you need to receive files for your own business, or if you represent a myriad of clients that need to receive files of their own, there’s a more professional way to do that than a public Google folder.
One thing to understand is that having a tool for file uploading isn’t all you need. You must have a way to get notified that there was a new file received, and also manage the files.
Receiving uploaded files straight to a cloud account is something you can do by using the MightyForms’s integration with Dropbox or with Google Drive. And that is a great help in terms of automation since you can work with the data collected with the form and the file associated with it, without having to lose time looking for it and adding it in your cloud storage folder.
How to receive files in Cloud Storage
The File Upload field was created so you could streamline a business’ workflow, facilitating the process of uploading and requesting files. And you can add this field to your online form in your MightyForms form builder in the simplest way.
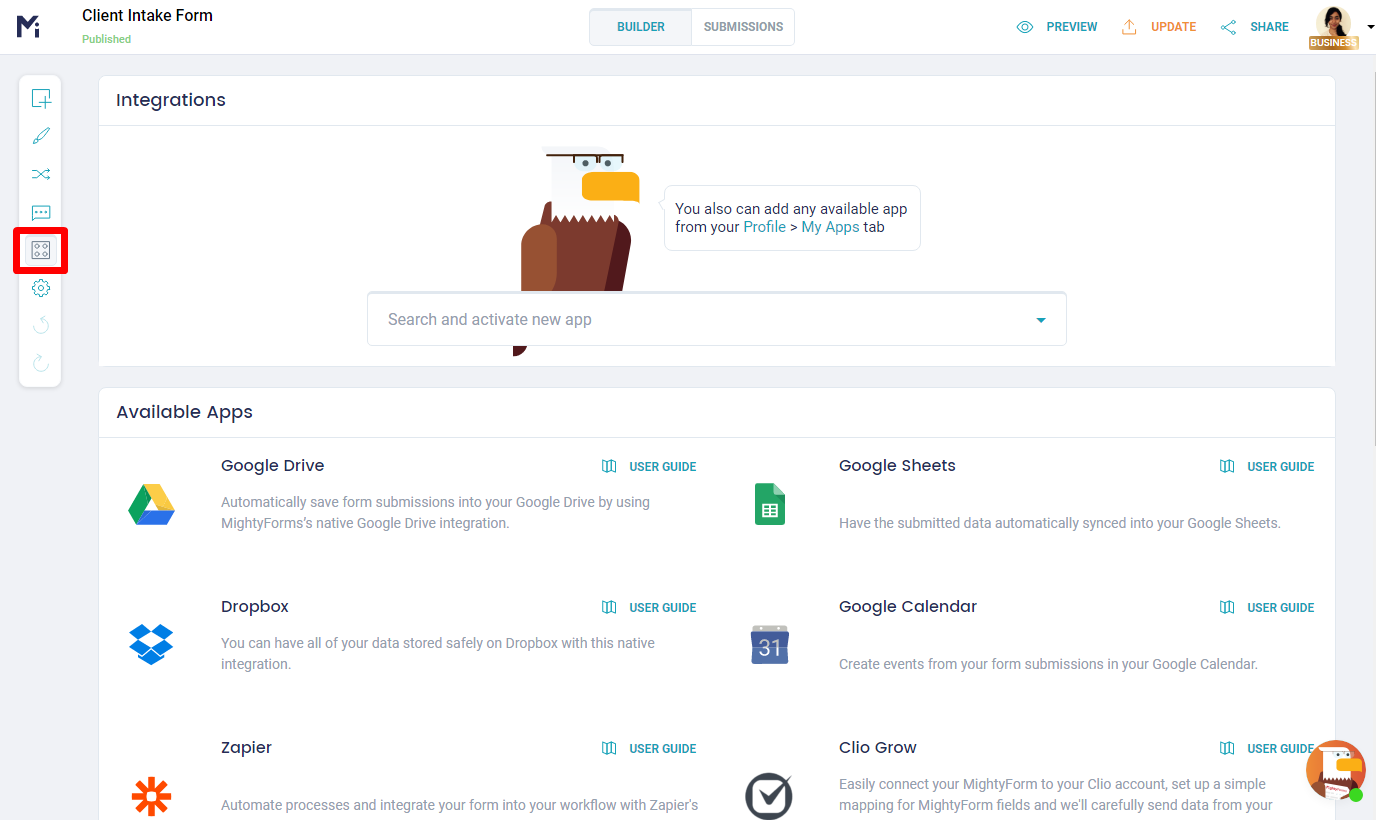
Currently, there are two cloud storage services that you can connect automatically to your online forms to receive files. Set up the integration on the My Apps dashboard, or Integrations Menu when you create a form. You can even set up more than one account, if necessary.
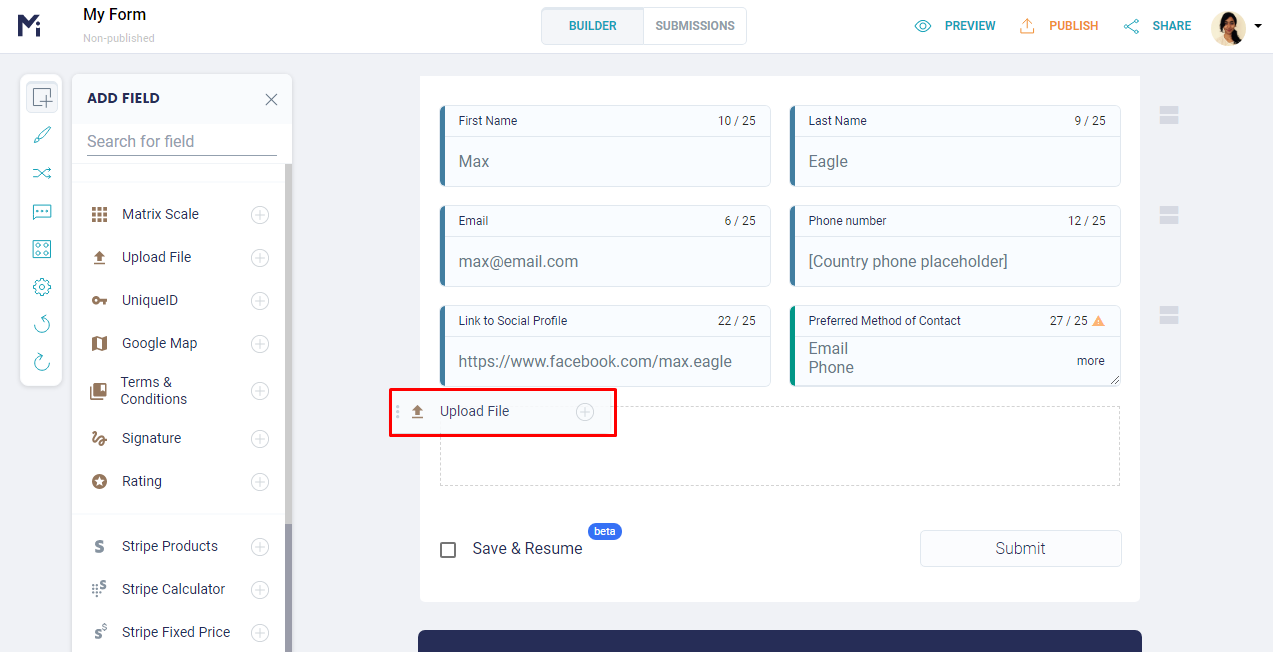
Then you drag and drop the Upload File field to the form, and set up in the builder itself which folder the files will be sent to.

All submitted files go straight to the registered Cloud account. You don’t have to worry and keep looking for it amongst emails (though you can add a notification to receive the file via email). To download the content you only have to access the Drive account and use the uploaded files in the way you find more convenient.
Keep reading to learn how to receive the submitted files both with Google Drive and Dropbox integration.
Google Drive Integration
You can receive all the uploaded files straight to a designated Google Drive folder by integrating it with the MightyForms account. That way you won’t lose the uploaded files and can organize everything that has been uploaded, streamlining your workflow.
The files are automatically uploaded to the integrated account, which means that you don’t have to waste time to find the file and add it to the proper place that you need it to be.
To set up this integration, the first thing you need to do is log into the MightyForms app and create or edit an existing form and then go to the Integrations settings and select Google Drive.
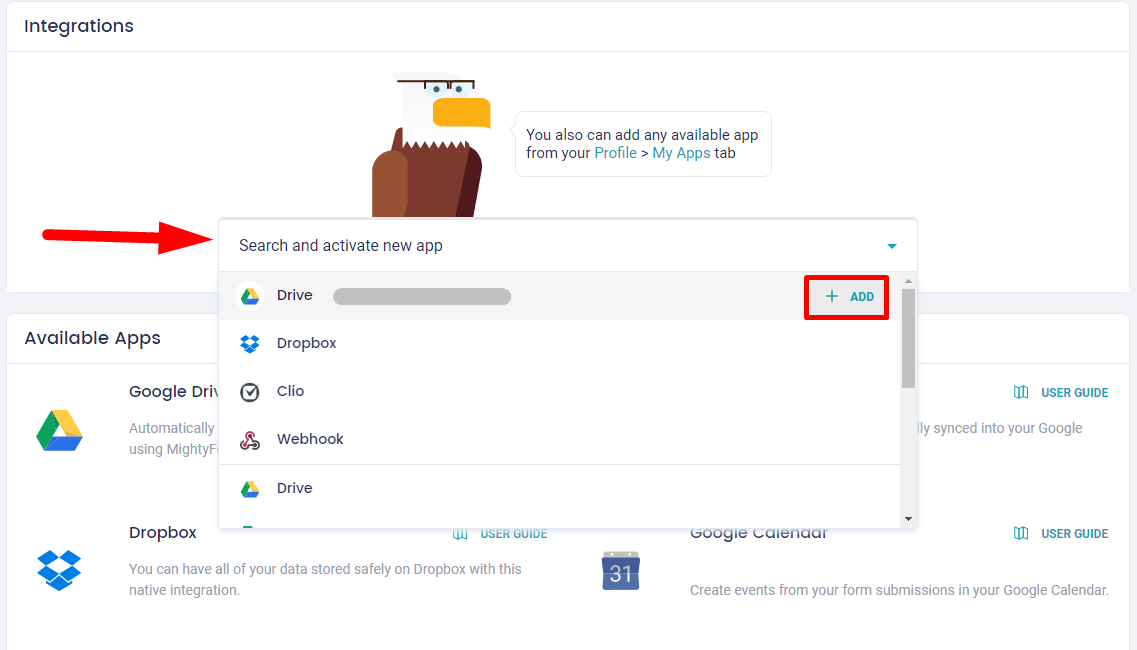
Now all you have to do is sign up to your Google account and allow its integration to the MightyForms app. Enable the integration and then come back to the form because now you have to drag and drop the File Upload field on the place you need it within the form and switch to on the integration at the field properties.
And then you can adjust everything about this field like the type of file that can be uploaded and its size, the name of the field, and if it is a required field or not. Read more on limiting accepted file size and type.

Dropbox Integration
Just like Google Drive, you can streamline your workflow by using the Dropbox integration. The choice between the two cloud storage services depends only on your preference of use. MightyForms offers both for you to choose.

The first thing you do after creating the new form is going to the integration and add the Dropbox account, signing into it and giving permission to the MightyForms app to have access to the account. Remember to enable it by editing it before going back to the form.
Then all you have to do is edit the form, add the File Upload field and configure all the options on the properties of the field, adding a name to the label, like “Upload your profile photo” as an example. Adjust the field just as you need it for, with the right extension and size you decide should be permitted for file upload.
.png)
Receive files through a WordPress website
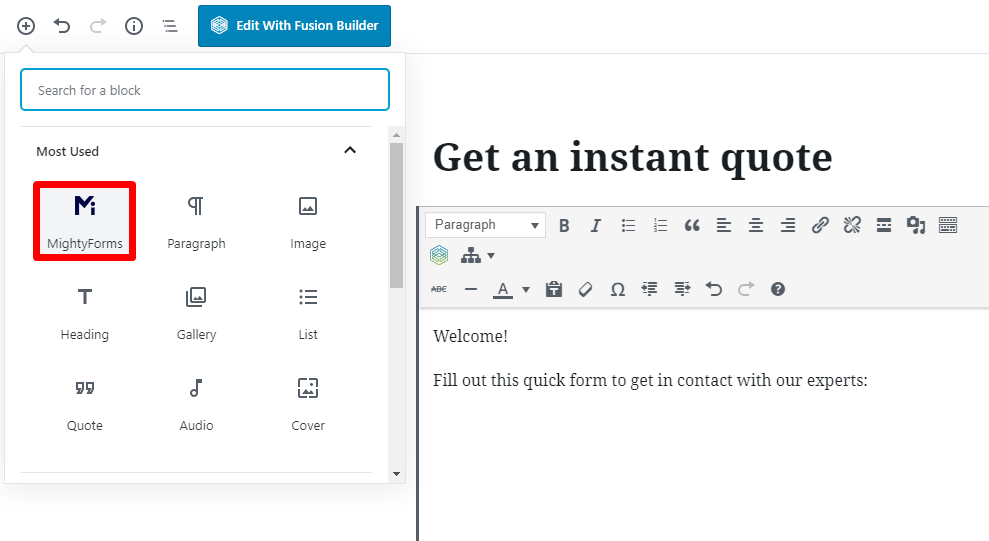
You can use any form you build with MightyForms on your WordPress website. Customize your form with your own branding, and review it before publishing it. Then click to share the form, copy and embed the code into your website, using the plugin, being in that way able to receive an uploaded file through your WordPress website.
MightyForms is also available as a form builder plugin within WordPress. The first thing you have to do is activate the MightyForms plugin. You can create, organize and edit your form right there in your WordPress dashboard so you can add by drag and drop the File Upload field following the steps we gave above. Then select the desired form from the MightyForms editor when editing your page. Check out our step-by-step to create a contact form in WordPress.
Why receiving files with forms helps your business
Imagine that you have a product to promote and want to know how a market demographic perceives it. If the feedback form allows users to send an image or screenshot along with their written opinion, you can see what the customer sees, getting a better understanding from their point of view.
Another use case is accepting files through the contact support form. If there is any issue with a website, app, or even a physical product, it’s much faster to perceive what the problem is when you have a visual cue. Because you put the File Upload field on the form the user can increase the message that they are sending, which also makes you understand what each client needs.
Naturally, it becomes an invaluable tool for a B2C business, and, if you are a B2B, you can offer it as a solution. Helping businesses create a better relationship with their clients is all part of what needs to be done when offering your services.
Just remember that all forms need to be clear and easy to understand so that they don’t have a high abandonment rate, and you can have the most accurate information and data collecting that is possible.

Why integrate cloud services to a web form
Now you already know that MightyForms integrates with Cloud platforms, like Google Drive and Dropbox. But what makes it so important to use this integration instead of other file sharing options? Well, simply put, this integration allows you to keep a company’s brand associated with the conversation that is happening in the exchange.
There are a lot of reasons to attach uploaded files to your forms, and we discuss them in this article. Some use cases include:
- A client wants to send you a photo from the product they need assistance through a contact form,
- A new customer has some important documents you can analyze if sent with the intake form,
- An existing client that has a damaged product, needs to send you a photo of the product so you can take the best action.
- Or perhaps you need to hire someone in your business. You can build a form and add it to your web page, with a tag “work with us”, for example. The respondents can fill the form and go beyond, sending their CV or a cover letter attached to it.
And there is no better way to access, safely store, and manage those received files than having the integration with a cloud storage service, making your job easier and lighter. All the files collected go straight to the folder and you can access it anytime you need them.
With the integration, received files are always organized and you know where to find them. You can access the files from any time and place, and, most important, you won’t lose them, after all, they are stored in a cloud service.
You can also receive them as an attachment straight to your inbox by setting up a notification with the Autoresponder tool. The file size and format can be determined in the field’s setting, so you don’t have to worry about files that are too heavy.
Receive files from any device
Being mobile-friendly is one of the basic rules when working with online forms. You must remember when building any kind of online form that 81% of all Americans own a smartphone.
With this data, it is easy to see why any form you build must be 100% responsive and easy to fill out from any device. With that in mind, online forms created with MightyForms are automatically responsive, which makes the forms easy to fill out either on mobiles or computers.
Having such concern can put you ahead of some businesses that aren’t giving the same attention to their clients. Being responsive and mobile-friendly is a must-have on the market. Especially when you need to receive files through an online form. So, make sure your resources are being thought for all devices.
Get notified and confirm each file upload
Just after the respondent presses the submit button they can receive an automatic message from your business. The message ends the submission on a positive note by confirming that the form was correctly sent and that you appreciate their participation or their message.
This is part of the customer experience and can have a great impact on business growth. Especially because this action represents the concern the business has with the client. Because the client isn’t kept on hold, wondering if they made a correct submission, they can look at the business as a respectful one and recommend it to friends and relatives. Sometimes one simple action is all you need to see the business grow.

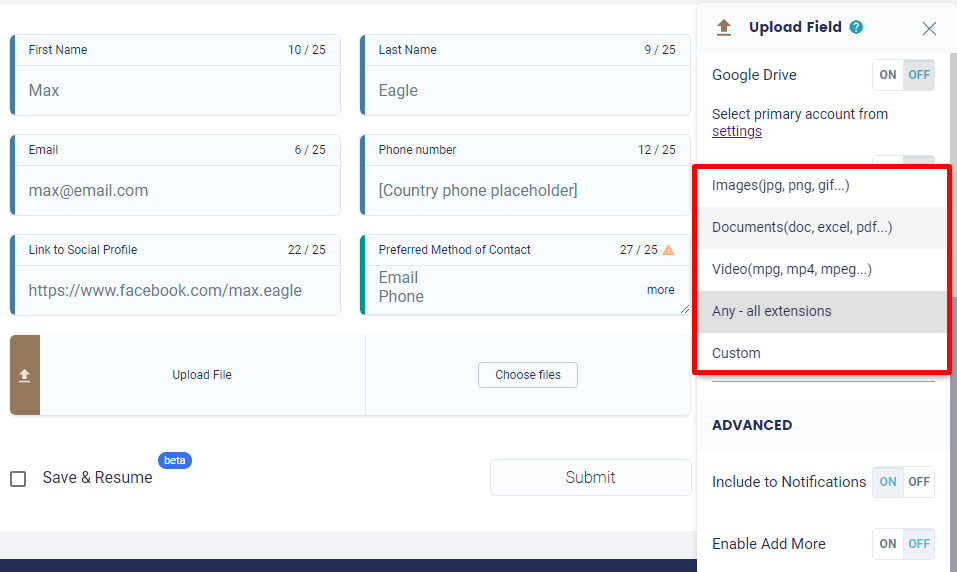
You can customize the exact type of file you are going to receive. All you have to do is go to the advanced settings and select ‘Custom’.
You first click on the Upload field and go to the basic settings tools on the right of your screen. There you can edit the field and choose, on the advanced settings, the type of file the respondent can upload and the maximum size it can have. It is this simple.
How to make sure you get the correct file
By limiting the type of the file and its size you can organize the data and files in a more accurate manner. As well the respondent won’t feel lost on what they should upload. And it is also important for your site security. Only the extension you’ve selected can be uploaded, and in the size, you have delimited, which guarantees the security of your blog.
Therefore, if you need that the respondent sends you a CV with the form, delimited the formatting asking only for PDF type of file. If it is a photo, choose the image extensions. Now, on the other hand, if you have a comment or contact form you can’t predict what type of file the customer is sending, you can allow any type of extension, but yet delimiting its size.
It is important to hold control on part of the information you are receiving. This way you can keep track of the files and organize them in a streamlined manner that allows you to quickly work with all the data and information collected.
What is a file extension delimitation
The first thing here is to understand the file extension. Do you know that character group that comes after the file name? It can be .pdf or .jpeg, as examples. Well, they are the extension and they can be delimited when to upload the file with the form. But why delimit the extension?
The file extension assists the computer to find the proper file for each submission that is needed because it associates the extension requested to be uploaded to the right type of file on the computer during the search. Example: if you need a .pdf for your application form the computer can show only .pdf extension when the respondent looks for it. That facilitates the process.
It also assists you with your data collecting and organization, since you can now separate by the format of the file and analyze each type separately.
How to limit the number of files that can be uploaded
The respondent can upload one file per field. But you can add as many fields as you need to the forms to be complete.
If you need information with your forms like the respondent CV and a letter of recommendation, maybe even more documents, such as a letter of motivation, you can add the fields and describe them for the respondent to add the right extension files on each of them.
Add only the real amount of fields that you need to your data collecting from each form. Otherwise, the form can become overcrowded and too massive, taking the risk of confusing the respondent, which can cause form abandonment.
Why you should limit file size
Delimiting the size of each file that the customer or the respondent can upload through a form is one way you have to control the amount of space that can be occupied by files in your cloud account. It is also a way to know the amount of space you can reserve for that specific type of file and purpose, separating the data with precision.
The server also has restrictions about file sizes and you have to pay attention to it when deciding which is the best size option for each uploading. MightyForms itself has a limit, but you can make it lighter if you need, just remember to let it clear to the respondent what is the size of the file they can upload to don’t cause any confusion with the information and then the respondent can be sure they are sending a properly sized file.
How to restrict file types and size
To restrict file types and sizes you can select the File Upload field and edit it by selecting the type of formatting and delimiting the size of it on the basic settings label on the right of your dashboard.
Choose the type among the options MightyForms gives – video, document, image – or you can decide to do a custom extension.
It is interesting to delimit the type of extension you are allowing to be uploading because this way you can have a pattern on the files you are going to receive, which makes easier the job of classifying data. This delimitation also works to tell the respondent which kind of file they can upload with the form.
Sizes and formats you can upload with MightyForms
When you decided that your form needed an Upload Field you probably already had in mind what kind of file you would receive. Here you can see the types and the maximum sizes of files you can receive from the respondent for each field you add.
Formatting Maximum Size Documents: Doc, Excel, PDF, etc3MbVideo: Mpg, Mpeg, Mp4, etc10MbImage: Jpeg, Png, Gif, etc3Mb
You can customize the exact type of file you are going to receive. All you have to do is select ‘Custom’ in the advanced settings.
You first click on the Upload field and go to the basic settings tools on the right of your screen. There you can edit the field and choose, on the advanced settings, the type of file the respondent can upload and the maximum size it can have. It is this simple.
Form templates you should integrate to Cloud Storage
You may use a lot of types of forms in yours or your client’s business, most of them that can assist with the business healthy growth. And sometimes you can burst this task by simply adding the option to the customer to send a file with the form. But, what kind of forms can you use with the integration feature and how can you receive upload files with each different form?
There are several types of forms that can be used with the uploading file feature, such as intake forms, job application forms, feedback forms, contact forms, surveys, HR forms, event registration forms, and legal forms. Below you can find the description for each one of them.
Client Intake Form

The client intake form can be used when it is needed to gather essential information from potential clients before the first meeting. You must gather all the information that you need, with precision, so you can save both time and money. You can get started right away with the intake form template above
Sometimes the potential client can send you some documents in order to assist you with the information gathering process. As an example, maybe the client can send with the form some plans for what they want or imagine in their marketing advertisement.
If you have the option on the form so the client can attach files you can improve your process. If you are a lawyer this can be the exact feature you were looking to advance your firm and provide the growth you were expecting. After all, now you can receive photos and documents to better analyze each case before accepting any job. All with just one online form.
Job Application Form

What better way to boost the efforts to find the best person to your company than allow candidates to attach documents to the job application form? You rarely can find it. All because with the Upload Files option you can ask the candidate to upload their cover letter, resume and, maybe, a letter describing themselves and why they want to work in your company.
In other words, having the option to upload files, and by marking it as a required field, you can speed up the process of gathering information about candidates, selecting only those that better fit your company to an interview.
Feedback Form

You are probably offering on the business website some kind of product or service. And, since you are looking forward to the company’s growth, you are also giving to the client a place so they can give you feedback. Check out specific steps you can take to create a survey with a high-response rate.
Feedbacks are the most efficient policy that can be chosen in order to know how the company is going on the market. Clients can say how they feel about the product or service that is being offered and then it is possible to decide if it needs improvement or not.
Sometimes it is some good feedback, with photos that show you that everything was in order. But it can also be that the client needs to send you a photo of a damaged product, or a mistake with the service the company provides, and the picture can show what happened. With such data in hand, you can do the attendance as it is precisely required, with no doubt on what is needed.
Here you don’t have to mark it as a required field on the form, after all, it is not always that feedbacks come with files, only when it is extremely necessary. Just provide the option and let your client decide if they need to use it or not.
Contact Form

As the feedback form, on the contact form, you don’t have to mark as a required field to upload files, since it is not always that people send files with their message. This would be a more detailed contact form that you add to your contact page to get more information from a submission.
People can attach, perhaps, a screenshot, reporting something they’ve noticed on the website, or they can send with the form something that can work well with your blog post, among other reasons they may have to upload files with their message. The important part is that you offer this option with the contact message.
It is a simple action that can have a big impact on how your potential client sees your business.
Survey form

You can use the survey to receive files from the participants as well. They send photos and documents to the data collecting if you decide it is useful for your poll. Perhaps you are making a study and want to know about the state of health of the population. You can look for files that can assist you in your data collecting, even given more credibility to the survey using official documents.
Maybe the respondent has the need to upload files to support their opinion. By using the uploading option you allow the respondent to give to the poll more information and data that you can use, providing more and accurate information.
Long surveys, even marketing surveys, can be benefited with the plain action of adding the field for upload files. You don’t have to mark this option as required, it can be only one more step to those participants that feel the need to add more information.
HR Forms

The company can use HR forms when it needs information from the employees, such as documents for the hiring process, among other reasons. And you can do all the processes through online forms and ask for any needed documents to be sent with the form, storing everything about the same employee at one fold on the cloud service.
This way you can guarantee both business and employees’ security and can be sure that any information won’t be lost since it is saved online.
The employee can send any document that is needed during the hiring process or even during evaluations of the company, and when they are disconnected from the company as well, keeping a recorded track of each employee. For any reason you need documents by doing it online you can facilitate the process and make it more secure.
Event registration form

Online events are where you need to be. Create an event registration form that optimizes your work process. You can have your event confirmation using forms to collect data from the attendances. And if you allow the respondent to send back files then you can collect even better and more precise data to your event.
You can, as an example, let the guests from your client’s wedding add photos with the bride and groom to create an online album, which lets the website of the wedding be more personal and dynamic.
Or maybe you have to collect more data from the speakers of an event you are hosting, such as a presentation letter or a bio to add to the event host page.
There are tons of reasons you can decide to allow your guests to upload files, or even to ask it as a required field. The type and the size of the files depending only on the purpose of receiving it.
Legal Form

You can add to the contract or any other business and legal forms a space to upload needed files. It can be marked as a request field, since, sometimes, it is imperative the assistance of certain documents such as work agreement contracts, or bank information.
These are specific forms that you usually use with clients, partnerships, or employees. Complex legal forms, like Credit Application forms, need all the necessary data in one swoop.
Or if you work within a real estate business you can also use the upload file feature. Or even with other attorneys’ business. Sometimes you can request pictures, such as in case of injuries or for insurance reasons, or maybe you need another type of legal documents attached to the form. The needs can vary, but the resource is the same. Drag and drop the field and integrate the cloud account to receive all the files your clients upload on the online form.
Next steps to your form building
The File Upload field is only one of the features that can assist any business with data collection. You can also add the Real-time Data Capture to know how many people are filling your forms and the abandonment rate as well. And you can’t forget about the messages to be sent after each form submission.
All these features exist in order to help your business have a healthy growth. They are tools that allow better customer experience and data collection, improving the entire system you are working with.
Don’t forget to always use a pattern in your form that consists of the business brand. Use colors and typography that has a link to the business purpose and that can transmit an idea that belongs to it. Build your forms to be distinctive and unique.
Now that you know everything about how to upload files with a form you can start collecting and storing data with your own forms. Start building forms on MightyForms, choose the best plan for your data-collecting goals and start receiving the information that you need today.

