Autofill is a function on a browser or program that can automatically fill in fields with saved data. Online forms that allow autofill are especially useful to save users’ time for common fields like Name, Email, and Address, but they can also be used to autofill information like passwords and credit card numbers.
It’s a bit of controversial functionality and every developer and user has their own point of view on autocomplete forms. Some are in favor, after all, it helps the respondents to fill out any form faster, others are against it since it can collect sensitive data and store it in the browser cache, which can be vulnerable.
The autofill, however, was designed to help respondents to fill out forms faster and accurately, and developers to get higher submission rates.
Since users can choose to turn off this functionality with a quick switch on their browser settings, it’s up to developers and no-code form builders alike to create forms that adapt either way.
You can build your forms to allow the browser to use and store only specific information from autofill forms, and help the respondent to submit it, regardless if they are on mobile or desktop.
Now let’s break down further what form autofill is, the difference between autofill and autocomplete, and how to create an autofill form in HTML, as well as how to create it with a form builder.
What is form Autofill
For the end-user, autofill forms mean that they can use saved data from the browser to autocomplete online forms. When the autocomplete is turned ON, the browser itself fills out the form fields for the respondent. And more interesting is that you, as a developer, can enable the autocomplete but disable it for specific fields. Or vice-versa: you can turn OFF the autocomplete, except for specific fields, that can be left ON.

The autofill form can help respondents to fill out the form faster, and encourage them to submit it. Autocomplete also spares the respondent from keeping adding and writing repeated times the same information. One more positive point is that the autofill reduces the chances of errors, mistakes, typos, and even if the lead forgets some data, it can be autocompleted.
On the other hand, respondents can have a few problems that can be caused by having autofill, like not having enough security from the browser. Even so, browsers are getting safer each day, so you may not have a real problem related to security.
In sum, the autofill specifies if the browser should or not add saved data on fields and the user can specify if they want this feature enabled or not on their browser settings. Autocomplete is a different feature that is added by the form builder or web developer, and it offers real-time suggestions as information is added to the form.
What is the difference between Autocomplete and AutoFill
Although very similar, including its function, autocomplete and autofill are not the same, and should not be confused with each other.
Autofill is a feature in web browsers. It’s used to prepopulate form fields with pre-provided data. Information like passwords, addresses, email addresses, names, and even credit card numbers can be stored by the browser using the autofill feature. And all this data is collected by using proper permission from the respondent. Everything is stored with high security by the browser itself, not the form.
If the fields are labeled correctly in the coding (or automatically by a no-code form builder), the browser will recognize what information is required in the form and fill in the data automatically for the user. Since this is on the user's end, it can only be enabled or disabled by the user, whether they use Chrome, Firefox, Safari, or others.
Autocomplete is also a software feature, but it’s used to finish off inserted data. Its main function is to suggest the next information after the respondent starts typing. It stores data in the browser and it’s used when a lead starts to fill out a form in order to make it faster. Google Search suggestions are a perfect example.
This is something that needs to be coded into the form. Or a form builder can cut coding time, and you can include a dynamic list of options from a Google Sheets, or specifically for the Address field you can enable Google Places autocomplete to offer a much more personalized experience.
Why allow autofill on forms
The main reason to have the autofill (or even autocomplete) enabled on your form is that some people are not too fond of filling out online forms, especially if they are on mobiles. Let’s face it, it may not be a really comfortable (or even fun) thing to do, not on desktops, much less on cell phones. And sometimes, forms are too long and tiresome, and even making them multi-step is not enough to make them more appealing. So, anything you can do to help the lead fills out the form and submit it is a good action to gather more prospects for your own business.
Basically, enabling autocomplete form can be summarized as a tactic to avoid losing leads due to form abandonment.
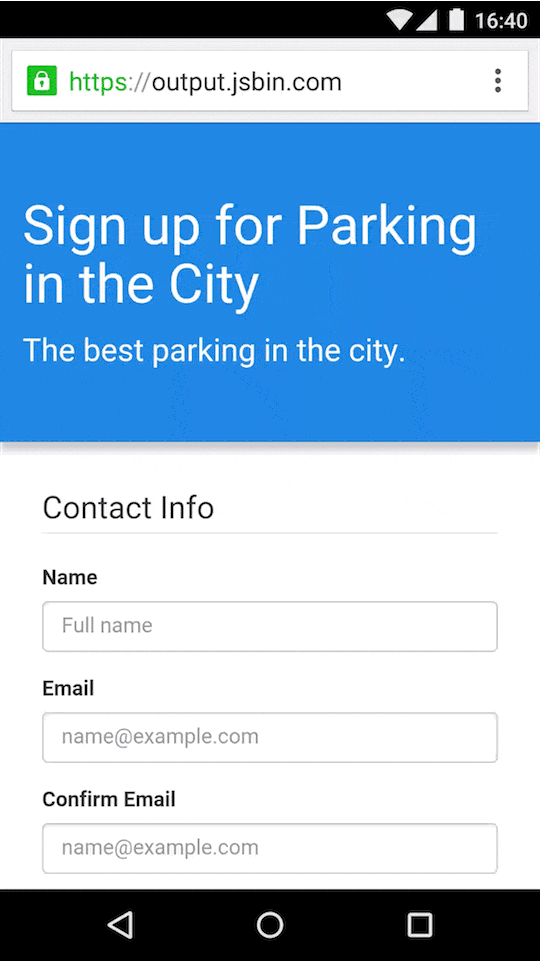
Can you remember when you started filling out a form on your cell phone and had to add your email address, full name, and any other information? Filling it out field by field?
Although autofill has been available by Google Chrome for a reasonable time now, some websites still do not use this resource correctly. Which can cause an increase in their form abandonment rate.
Since you want as many leads submitting the forms as possible, you’ll offer an opportunity to help the lead fill it out and send the form.
To help visitors and respondents
This is the benefit of enabling autofill and autocomplete in your forms. Sometimes the lead may forget some information, or maybe the data they must insert is too long and they don’t feel like typing it to fill out the entire form. With the autocomplete turned ON this is one of the problems that you can overpass and have a higher chance to have that lead submitting your form.
Autofill improves user experience
When it populates the form with repetitive data for the respondent’s comfort and convenience. Research by Google revealed that with the autocomplete on, visitors respond to the form 30% faster.
So Why (and when) turn off autocomplete forms
Sometimes autocomplete can compromise your security status. The type of data that the form field is requesting, or if the lead is accessing your form from a location with stricter privacy policies, like the GDPR. And those are important signs that may require for you to turn the autocomplete off.
Avoid storing credit card numbers, and other sensitive data
In case of payment forms, turn off the autocomplete for payment data, like the credit card number. This can keep your form safe and also protect the visitors’ bank information.
Deciding if the autocomplete will store passwords
It's also a great start to guaranteeing the lead’s security. Saving passwords is convenient for the lead since they won’t have to memorize every single password they create. I mean, can you remember all your passwords? I know I can’t. But if you’re not sure about the security of your browser, disable this option. Lead’s security comes first.
How to enable autocomplete in an HTML form
Breaking news: a few coding skills are needed here since you’re enabling autocomplete fields using HTML coding. But, if you don’t want to take a risk with coding, we have a special setting on MightyForms so you can enable the field without the need to code a single line. If this is your case, skip this part and go straight to Google's Places Autocomplete field for MightyForms.
But, if you do have some coding skills, these are the main steps for enabling the autocomplete.
Step 1 - Place the HTML elements
There are some HTML elements that you’re going to use in order to enable the autocomplete functionality.
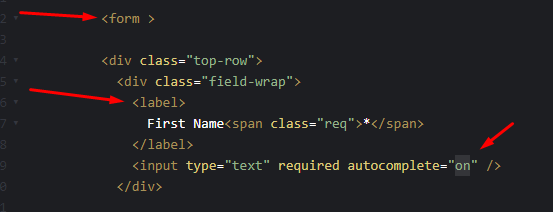
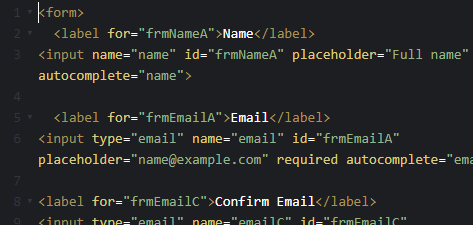
<form> Is used to create the HTML form.
<input> Is the most used element, and can appear in several types: <input type= “text”>, <input type= “button”> etc.
<label> Is used to define labels on the form. It's also useful for those who use screen-readers since they can read out loud what each label is about.
You need these elements to place each detail of your HTML form properly and make it work well. Each input must be first added with <label> to make a differentiation between them. And each label is responsible for meaningful information that activates a browser activity.
Step 2 - Help users remember their information
Every time a lead clicks on a <label> the system understands that the focus now must be its value. That’s why you use for= to give attribution, like name or id.
Since people can forget the email address they used or the login, the autocomplete can work by suggesting the output. To help them, make it clear if you’re asking for an email address, phone number, or ID.
<label for= “name”>
<label for= “email”>
Step 3 - Choose which keyboard the system should show on mobile
For mobile users, you can define which keyboard will be shown by adding the information for the browser. That makes it faster for the mobile user to fill out the form.
For example, <input type= “email”> will show a keyboard for email, and <input type= “tel”> is going to show the number keyboard.
Step 4 - Enable Autocomplete
Use autocomplete attributes to help browsers understand and add the correct data on the proper field, using stored data.
If you want the email field to autocomplete itself you can use: autocomplete= “username” or type= “email”.
Repeat it to any field you want to be filled out automatically.
How to disable HTML forms autocomplete?
To turn off the autocomplete, you will need to add OFF at the end of the autocomplete code.
So the code will be something like this:
<input type= “text” name= “email-password” Autocomplete= “off” />
Once you take this action, in this example, the browser won’t store any data about the lead’s password.

This is also how you create an autocomplete form, but adding specific fields without the autocomplete, or vice-versa, the form without autocomplete feature enabled but with specific fields with autocomplete turned ON.
Google’s Places Autocomplete Address form field
MightyForms is always concerned about security, that’s why we have all the protection for you and your lead as default, for free. With that said, you have no worries about using Google’s autocomplete for the address field. It’s a required field if you’re e-commerce using payment forms to sell and deliver your products. And no coding is required for this field.
How to build a payment form with address field autocomplete ON
Payment forms can be one of the most complex online forms you’ll need for your business. It requires a lot of sensitive data, but it can literally pay for itself. So why not make the process smoother for your clients by allowing a common field, like the Address, to have Autocomplete turned on.
Step 1 - Build your payment form
After you’re logged in to your MightyForms account you can start building your form. Start it from scratch or from a form template. You can find free payment form templates that you can customize for your business goals.
Drag-and-drop the fields, reposition them, and change their size as well, to make it a perfect fit for your purpose. Each field you add to the form must be justified and have their reason to be there. Asking for too much can affect your form abandonment rate.
And, then, it’s time to add all elements that can connect your form to your business and to the rest of your website. Change the color scheme, background image, typography, and don’t forget to add your company’s logo.
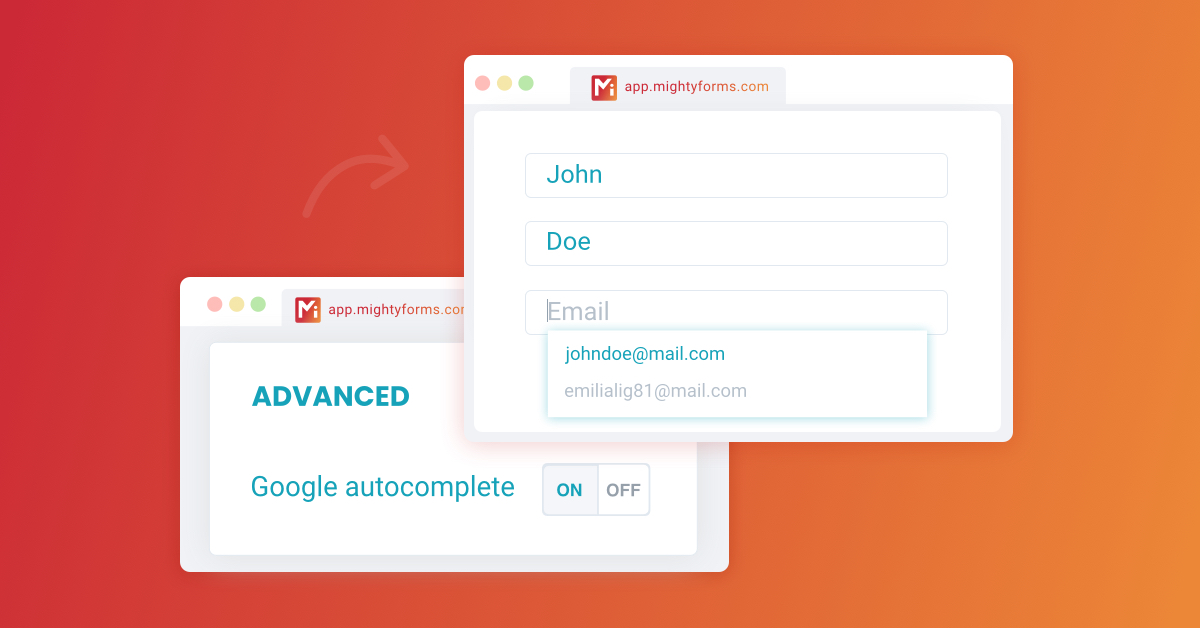
Step 2 - Set the Address field Autocomplete
Click on the Address Field, which will open on the right side of the screen its own settings.
Once on it, you’ll scroll down until Advanced options. There you’ll see Google Autocomplete. Switch it On.
Just like that you can streamline your form, making it faster for the lead to fill it out, and without having to do any coding.

Step 3 - Automate your form
Now it’s time to automate your form, guaranteeing it will work for you by:
- capturing more leads for your business
- sending automatic notifications
- sending thank you messages to the leads.
- sending nice reminders for those who have not submitted the form.
- generating Form Reports and Analytics
- creating A/B tests to improve the form
Using the right tool, feature, and integration, you can automate your form easily. Then you can focus on the results and optimization.
MightyForms is an easy-to-use form builder, yet, very powerful. You can build attractive forms that are responsive by default, so your custom designs show up beautifully in any screen size. And by setting up automation tools and integrations, you can guarantee a reduction in employee-hours spent on mindless tasks. And with the Address field autocomplete on, is easy for you to get faster responses, and reduce the abandonment rate.
Count on MightyForms to help you keep your leads, increasing the number of form submissions. Start now for free and see what MightyForms can do to boost your business.
