.png)
WordPress is easily the most popular website publishing platform freely available, adding a contact form can be very simple with the right tools. In this article we’ll present an in-depth step-by-step to create a contact form in WordPress.
The challenges caused by the pandemic have already taught us so much. In the midst of the much-needed quarantine, we have realized how important online interactions can be, since physical presence was limited or even banned in most parts of the world. However, if social distancing was practiced outdoors, our online presence has escalated high.
Never before in history, our daily routine had to be carried on online, almost exclusively. Most people were working or taking classes from home. Doctor appointments were performed virtually. Our online shopping increased by 40%, even among those who weren’t used to or disliked buying groceries through a website.
If there is an opportunity in every crisis, the key learning from 2020 is that online presence and proper contact form matters just as much or more than the business itself. Thus, we’ve decided to come up with this piece of enlightenment! Keep on reading this post while we cover in detail how you can create your online contact form in WordPress, using the best online form builder plugin, the MightyForms. Welcome to THE contact form tutorial, I’ll be your guide!
Watch the quick Step-by-Step video guide in install and create a contact form with the MightyForms Form Builder Plugin:
Why use a contact form on your WordPress site
WordPress, the free and open-source content management system, is the house of more than 60 million websites. And it is easy to understand why. WordPress stores content and enables its users to create and publish beautiful web pages, requiring only a domain and a hosting service, free of charge.
But more than just choosing one of the WordPress themes as the layout for your website, you should consider including a contact form in it, with just as much interest and importance. If your website goal is to sell products or offer a service, then more than others you need an effective and secure way for visitors to reach you.
A contact form is a set of basic questions that visitors fill out in order to get feedback from webpage owners. You can effortlessly add a contact form into your website using a WordPress plugin, without any coding skills needed and we’ll go over that in detail ahead. If you think that just including an email address and phone number on our website are enough, see below why you need a contact form.
Here are 6 Benefits of having a contact form on your website:
1. Avoid Spam
Your website will be vulnerable to spammers that automatically add unprotected email addresses to their mailing list. Instead of getting emails from potential customers, you’ll get all sorts of unwanted electronic junk.
A standardized contact form will be easier for real people interested in your business to reach you while protecting your email address. It will save you time, so you don’t waste it by perusing and classifying all incoming emails. And it will save you money too, since you won’t miss a genuine opportunity to make a sale or to book a service.
2. Increase Security
By blocking unwanted spam, you’re also adding extra security by also blocking malware and hacking attempts. A contact form will act as a barrier to filter real customer inquiries from automatic malicious attacks.
The security can be even increased when you activate the reCAPTCHA function in your form building setup. A CAPTCHA is a type of challenge-response test used to distinguish human users from robots in order to prevent bot frauds. Additionally, if you build your contact form with MightyForms, all data exchanged will be secured by end-to-end SSL encryption.

3. Enhance Your Brand
Imagine working so hard on your product or service and display it all in a beautiful website and not get one result simply because visitors can’t or choose not to reach you. It will be a shame if your contact form is not visible or if it doesn’t look professional or safe enough for people to fill it out.
Think of a contact form as part of your brand, therefore it should represent you well. Using a form builder will allow you not only to create a great-looking form with your brand logo but one that will properly function, as well. An effective contact form will cause a good impression on visitors, boosting your reputation.
4. Optimize Data Collection

If you only make available an email address or social media for contact, you’ll get incomplete information at best. People have different ideas of what is essential information to be shared in an inquiry email.
When you offer a contact form with predetermined fields, you are being clear about what information is important. If you use a form builder like MightyForms to create your contact form, you can even mark specific fields as required.
Beyond gathering data, you can also automate the tasks of the contact form process, by choosing where to automatically direct all messages. You can also export data to Google Sheets so you can better analyze information and learn more about your audience.
5. Increase Your Email List
Acquiring a new customer can cost five times more than retaining an existing customer. The people on your list are already aware of your business and most likely interested in your offer, so you’ll save time and money.
An email list can be a powerful tool when you need to launch a new service/product or to roll out a promotional campaign. A contact form will provide enough information from your prospects to build your list and you can automate that data for CRM purposes later.
6. Engage Prospects
Your website works like a physical store, you want passersby to take a peek and get inside instead of walking away. A contact form is how you engage visitors to want to know more details, it’s your direct call-to-action. It is also reassuring for visitors to hit a “submit” button knowing their inquiry is processed to be eventually answered and not ignored.
When creating your contact form with a form builder like MightyForms, you’re also able to make it even more engaging. Your contact form can be set up as multi-step, so visitors will be led to each question one at a time, instead of viewing a full contact form and get discouraged to answer too many questions.
Also, presenting your contact form in a multi-step structure, thus turning it into a conversational form, will work as a casual chat. This form of engagement might be very effective for informal business and independent professionals, giving off that feeling of already talking to each other.
How to Choose a Type of Contact Form
Now that you understand the benefits of having a contact form on your website, you should start considering it as a strategic element of your business. You’ll be already better presentable with a simple basic contact form instead of just providing an email address. However, you can go even further when creating your contact form with a form builder, like MightyForms.
Examine your type of business and what goals you want to achieve. This should guide you to create a more comprehensive contact form that will get exactly what you need from visitors. These are the three main purposes of contact forms:
Call Back If your business is tailored-made, visitors may use this type of form to request a call back to schedule an appointment or to get an estimate of services, for example.
Feedback It is important to let your customers voice their opinion since it can guide you to improve or enhance your service or product. This type of form makes giving feedback inviting and convenient.
Information request As clear and thorough as your website can be, people might still have questions about your business. You can keep it generic or categorize this type of form with a drop-down menu, so visitors can inquiry you further.
How to Create a Contact Form in WordPress
If you came this far, you have already a website published on WordPress and now you’re looking for detailed directions to add a contact form. WordPress allows users to add this functionality with a form builder plugin.
By typing in “contact form” on the search box under the WordPress plugin directory, you’ll end up with 980+ options of form builders. Some will be basic, others complex, some free, some paid. However, you want to create a smart contact form that will do much more than simply collect contact information.
You need a value-added contact form, where it is not only easy to build it but one that can be edited and integrated with other platforms so it can get results! That’s why we believe that MightyForms can really take your contact form strategy to the next level.
Step 1. Install form builder plugin
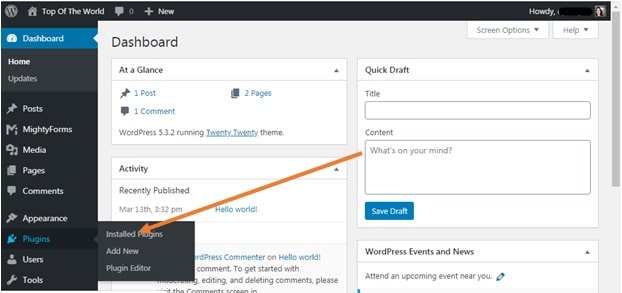
1.1. From your WordPress dashboard, click on the Plugins tab from the sidebar menu on your left. Then, click on Add New from the Plugin sub-menu.
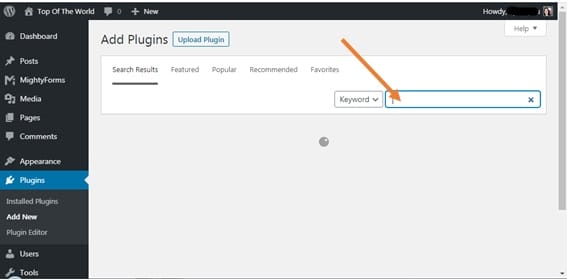
1.2. Now, you need to find Mighty Forms from the Plugin Directory. Simply type in MightyForms in the search box to be taken straight to the app.
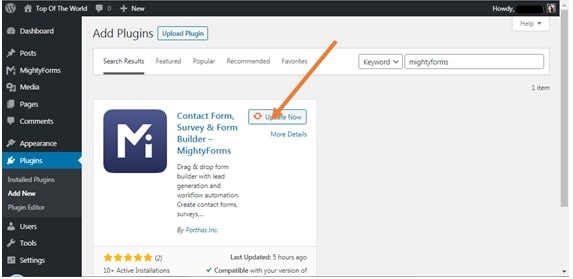
1.3. WordPress will show you the MightyForms plugin as the search result. Then, click on the Install Now button located on the top right-hand corner of the app box.
1.4. Once the installation is finished, you should go ahead and click on Activate, now located on the top right-hand corner of the app box.

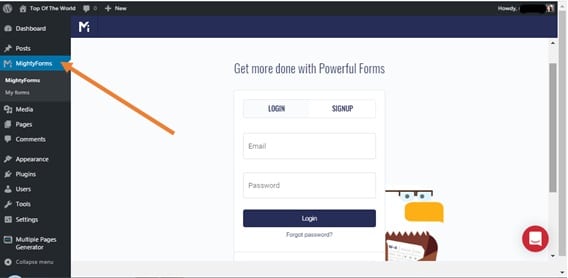
1.5. Once activated, the MightyForms tab should now appear on your WordPress sidebar menu on your left. Click on it to go to the MightyForm app within WordPress and to be taken to the next step.
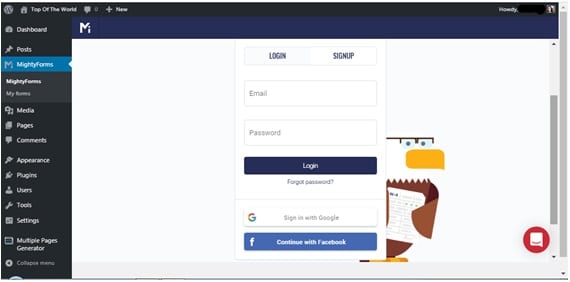
Step 2. Login or Sign up to the MightyForms Builder
2.1. Go ahead and log in by either creating a MightyForms account, providing an email address and a password, or simply sign in using an existing Google or Facebook account.
Step 3. Create a New Form
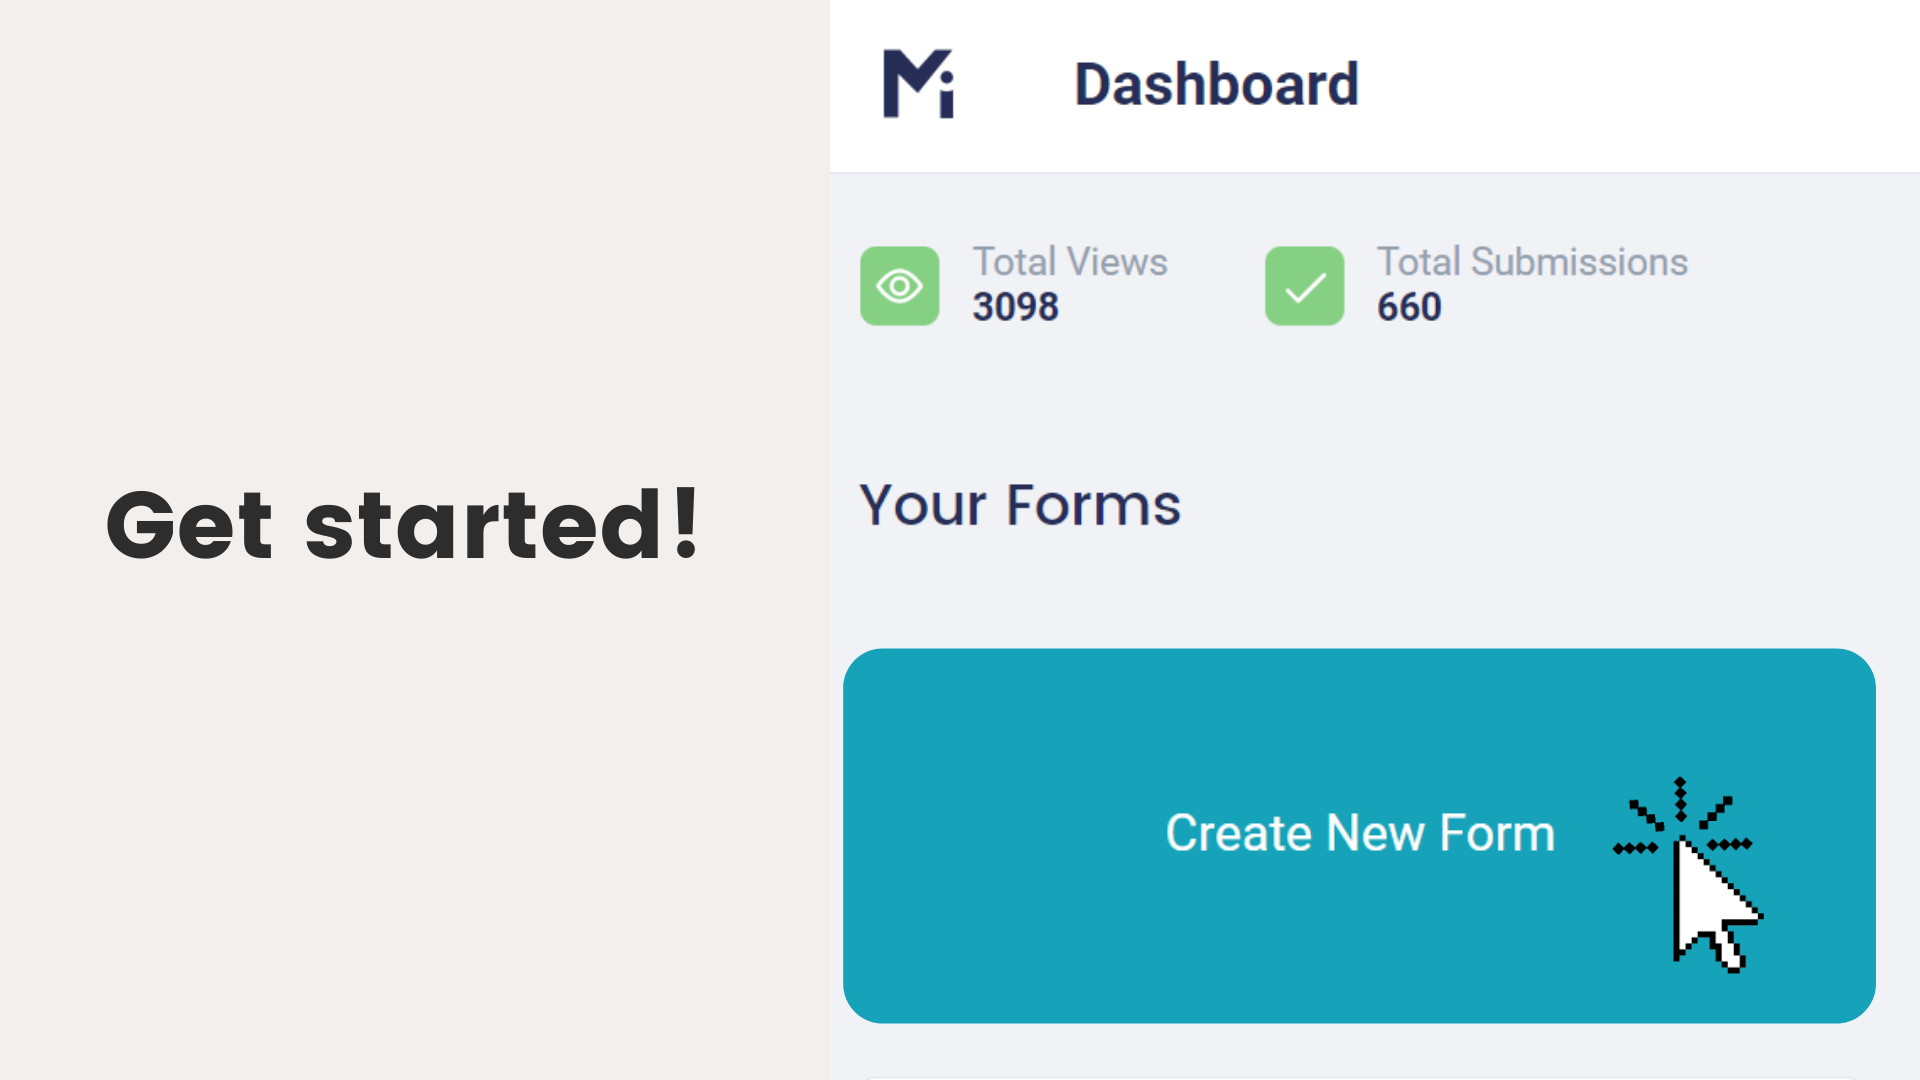
3.1. You should now be looking at MightyForms Dashboard. If you have created a MightyForms account, you’ll be shown a tour video. Let’s get started on the form building. Click on the Create New Form button on your dashboard.
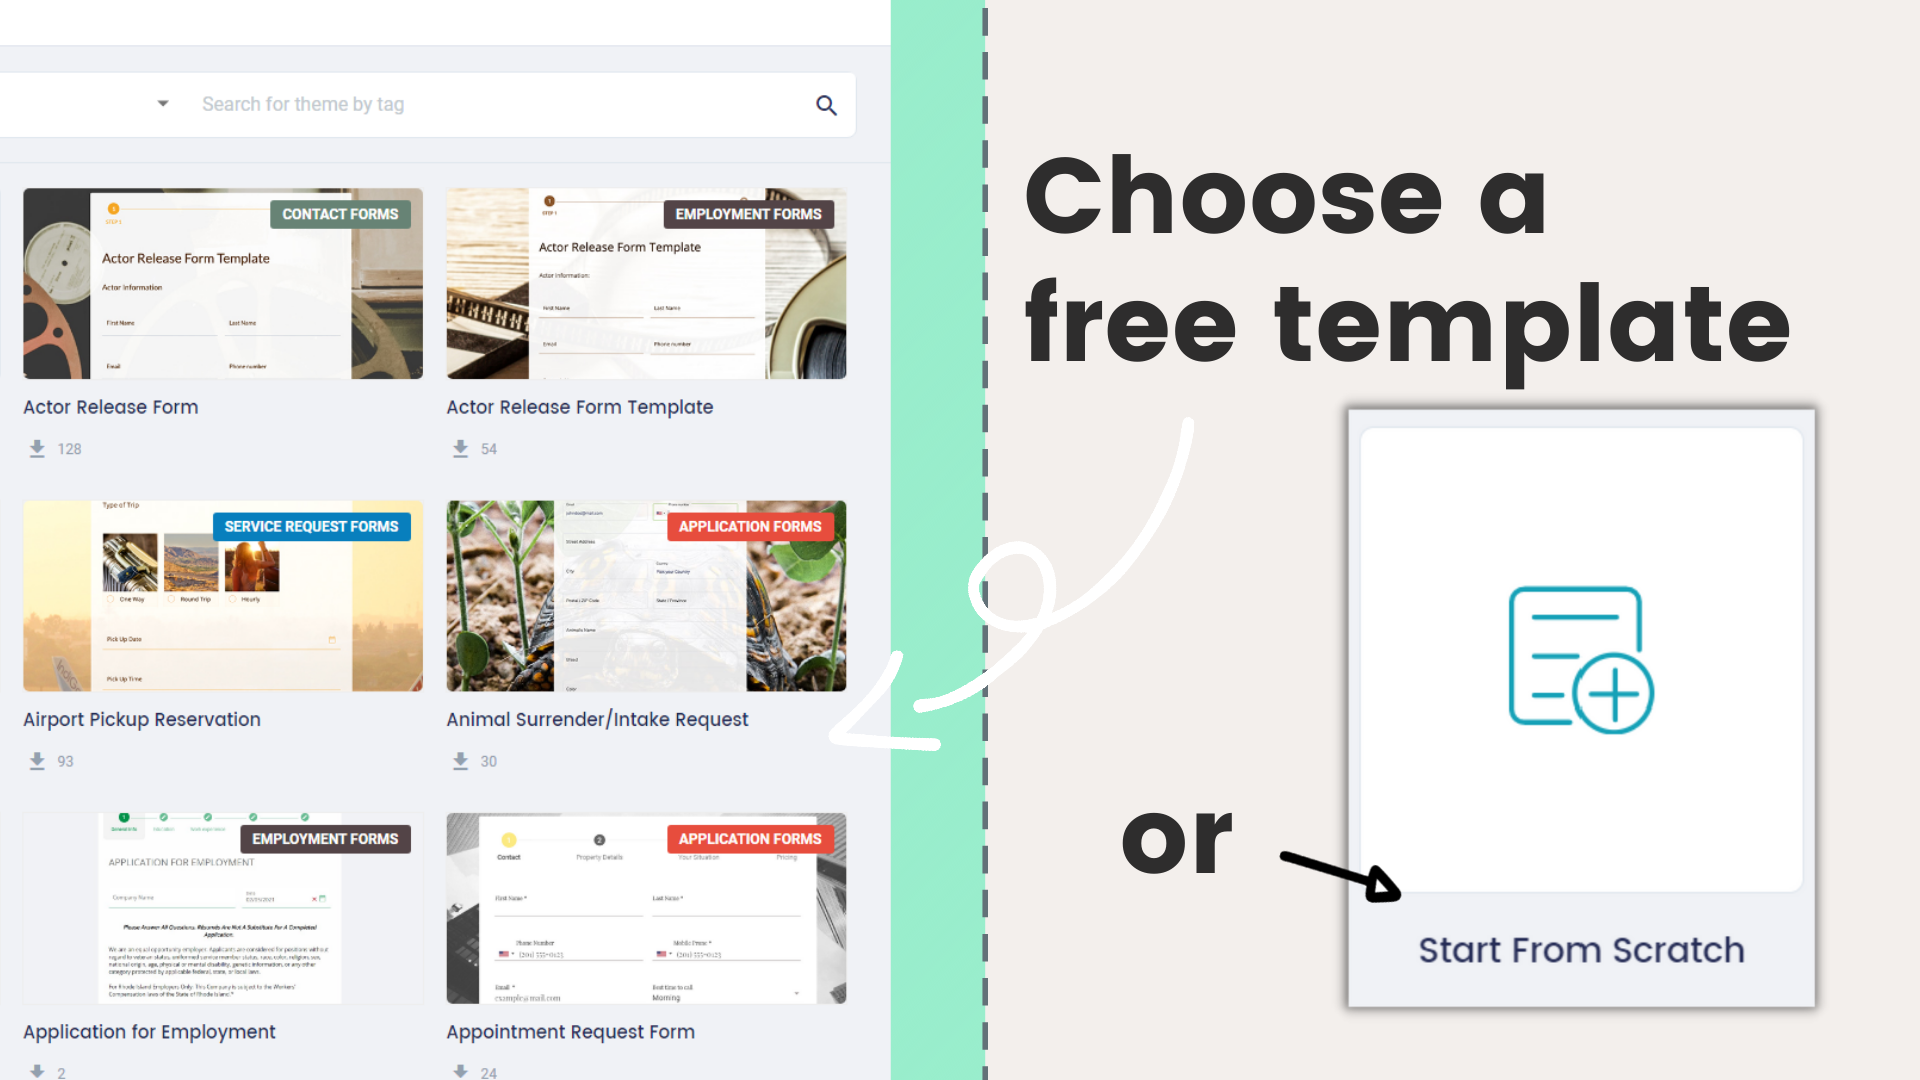
3.2. Now you’ll be given the choice of how you would like to start: From Scratch or From Template. Let’s go over each next.
Step 4. Add fields to create a Contact form From Scratch
4.1. When you select to start your contact form From Scratch, you’ll be taken to the Builder Dashboard. Now there’s a new sidebar menu on your left and a blank block in the center. Simply drag the elements you want from the sidebar menu and drop it in the blank block.
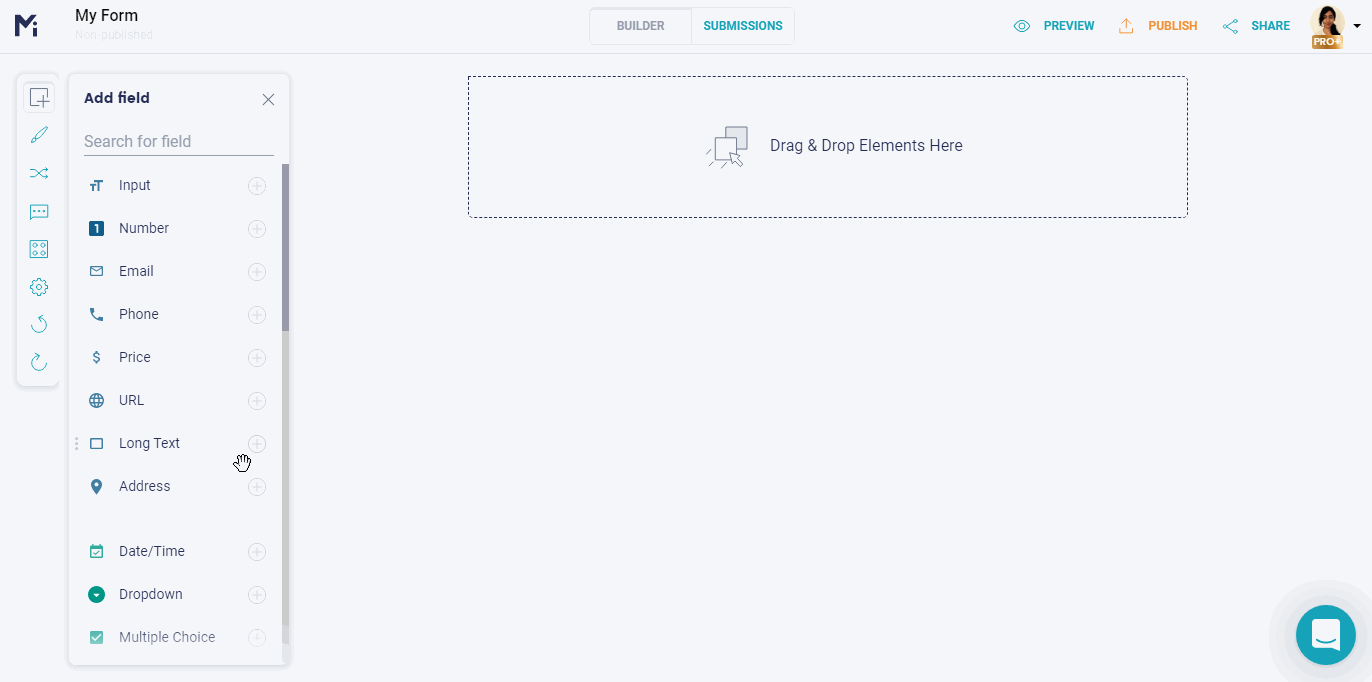
There are standard contact elements available as field options, like Number, Email, and Phone fields. But there are also customizable fields that you can edit according to your needs, like Input, Custom Content, and Terms and Conditions, so you create your own specific field. You can also choose from Single Choice, Multiple Choice or Dropdown fields as field formats.
4.2. You can resize and reposition any field. Go over the field with your cursor to resize it or to reposition it, then click and grab it with your cursor and drag it to where you want it.
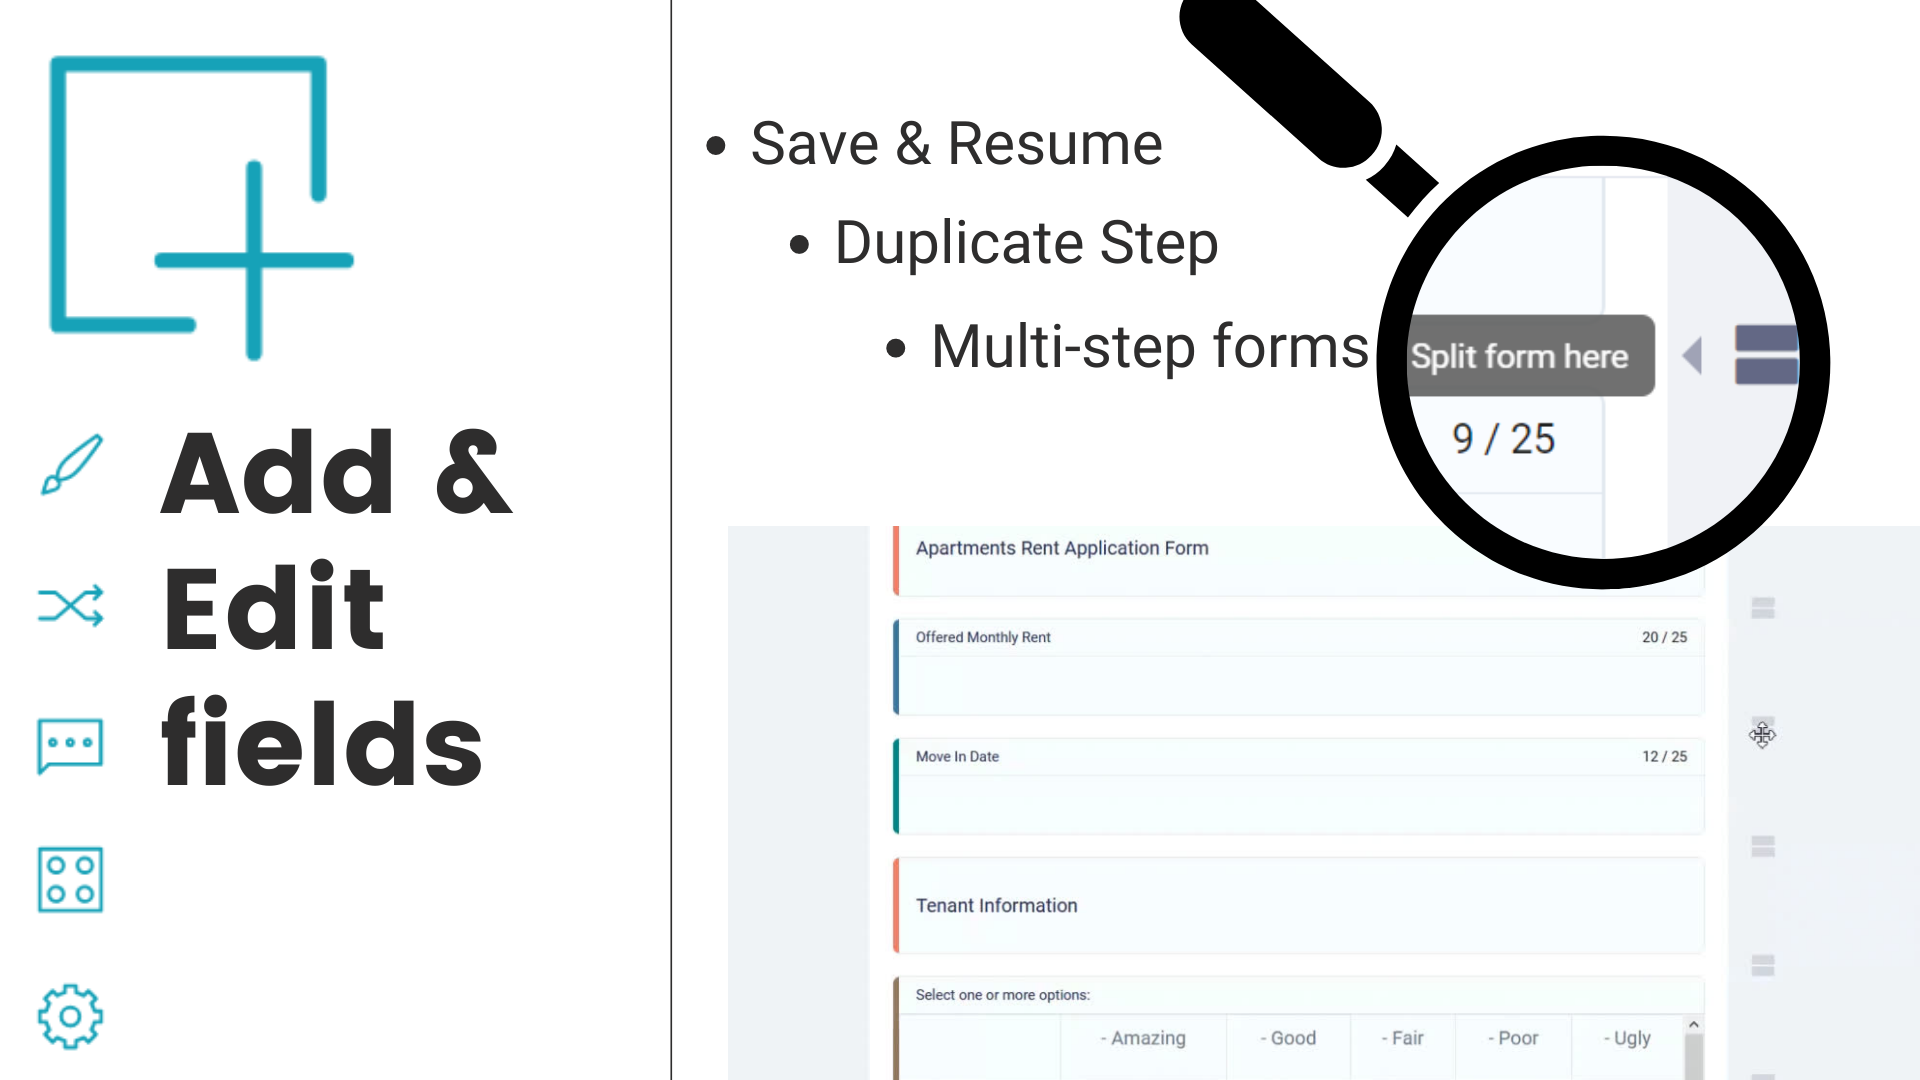
4.3. On the sidebar menu on the right, you’ll find advanced field settings, like marking fields as required or whether to show or not the field label on your final contact form version.
Step 5. Customize a contact form Template
5.1. If you prefer to start building your contact from a pre-made template option, click on From Template on the initial page. You’ll be taken to MightyForms app in order to select a template, but don’t worry, any choice and edits you make here, will sync up to WordPress.
5.2. You can easily choose, edit, publish, share, and embed all kinds of free fillable form templates. In the Form Templates directory on the MightyForms app, you can sort through templates by Types, by Industries or by Themes.

Once you find a template that suits your needs, click on Use Template. You’ll then be taken back to the MightyForms builder dashboard on your WordPress, so you can edit that template. You can customize, reposition, and resize any element of this template as well.
Getting to know more about MightyForms form builder
MightyForms is a form builder that offers comprehensible solutions for web designers, business owners, and independent professionals. MightyForms solutions are readily available on the WordPress plugin directory, as well as a separate app. It is easy-to-use to create unlimited forms with unlimited fields and submissions.
You can create all sorts of forms with MightyForms, like email subscription forms, order forms, payment forms, surveys, and of course, powerful contact forms. MightyForms form builder offers easy and intuitive form building with a drag-and-drop editor that requires no coding skills.
MightyForms works seamlessly with WordPress, enabling you to embed your contact form into your website with just a few clicks. You have total control while you create a fully responsive, 100% mobile-friendly, and easy to fill out contact forms. And to help your business grow, MightyForms increases your productivity by automating all workflows of your contact form process.

MightyForms was created to solve online form building problems that other plugins couldn’t solve. Consider these MightyForms features and functionalities when creating your contact form:
• Build from scratch or from a template
• Easily resize and reposition any form field
• Choose from single choice, dropdown options or checkbox types of field
• Edit font, grid size, and colors while personalizing it with your own logo
• Preview your contact form from any device (desktop, tablet or mobile) to assure responsiveness
• Abandoned form recovery feature allows you to keep track of submissions as it is being filled out
• Determine which fields are required or create multi-step questions
• Set up a personalized pop-up success message after submissions
• Count on reCaptcha V3 to protect your contact form from bots
• Easily integrate contact form to Google Tags Manager and Google Analytics for advanced CRM analytics or to Google Optimize for A/B performance testing
• Set up automatic email notifications to visitors, yourself or anyone else in your team
• Update or edit your contact form anytime you need
• Seamlessly integrate your contact form to other platforms for even more automation, like Google Drive, Google Sheets, Dropbox, Zapier, among many others.
Contact Form Design and Spam Protection – cont.
After you’ve selected all contact form fields needed and established advanced settings for each element, you now have the basic contact form structure laid out.
Even in this elementary structure, this contact form is already fully responsive! However, let’s keep going and we’ll show you how to style this contact form in order to make it popping and eye-catching.
Step 6. Contact Form Design Configuration
6.1 Click on the Design tab, on the top center of the dashboard to be taken to the Design Dashboard.

6.2. Now you can customize and style your contact form just as you want it. From this Design Dashboard, you can select from suggested theme options on the sidebar menu on the left of your screen. Go over the theme options with your cursor and click on Apply to select a theme suggestion.
6.3. From the sidebar menu on your right, you can further customize any element of the chosen theme for your contact form. Simply select the desired font, font color, font size, font style, background color for any element.
Step 7. Spam Protection
7.1. ReCaptcha V3 is automatically enabled in all webforms created with MightyForms, to better protect you from bot fraud.
Contact Form Automation and Integrations – Advanced Steps
By now, your contact form should be good to go but wait, it can be GREAT. MightyForms form builder turns a simple contact form into a powerful tool with advanced features and functionalities. Stay with us to see how easy it is to automate your workflow.
Step 8. Success Page and Notifications
8.1. Click on the Notifications icon. In order to enable that an automatic success message pops up after visitors submits a form, switch this feature on. You can fully customize the email notifications
8.2. After enabling a success message, you may go ahead and write a personal text that you would like your visitors to receive right into the message box. Alternatively, you can copy a pre-written text from a Word document, for example, and then paste it into the message box.
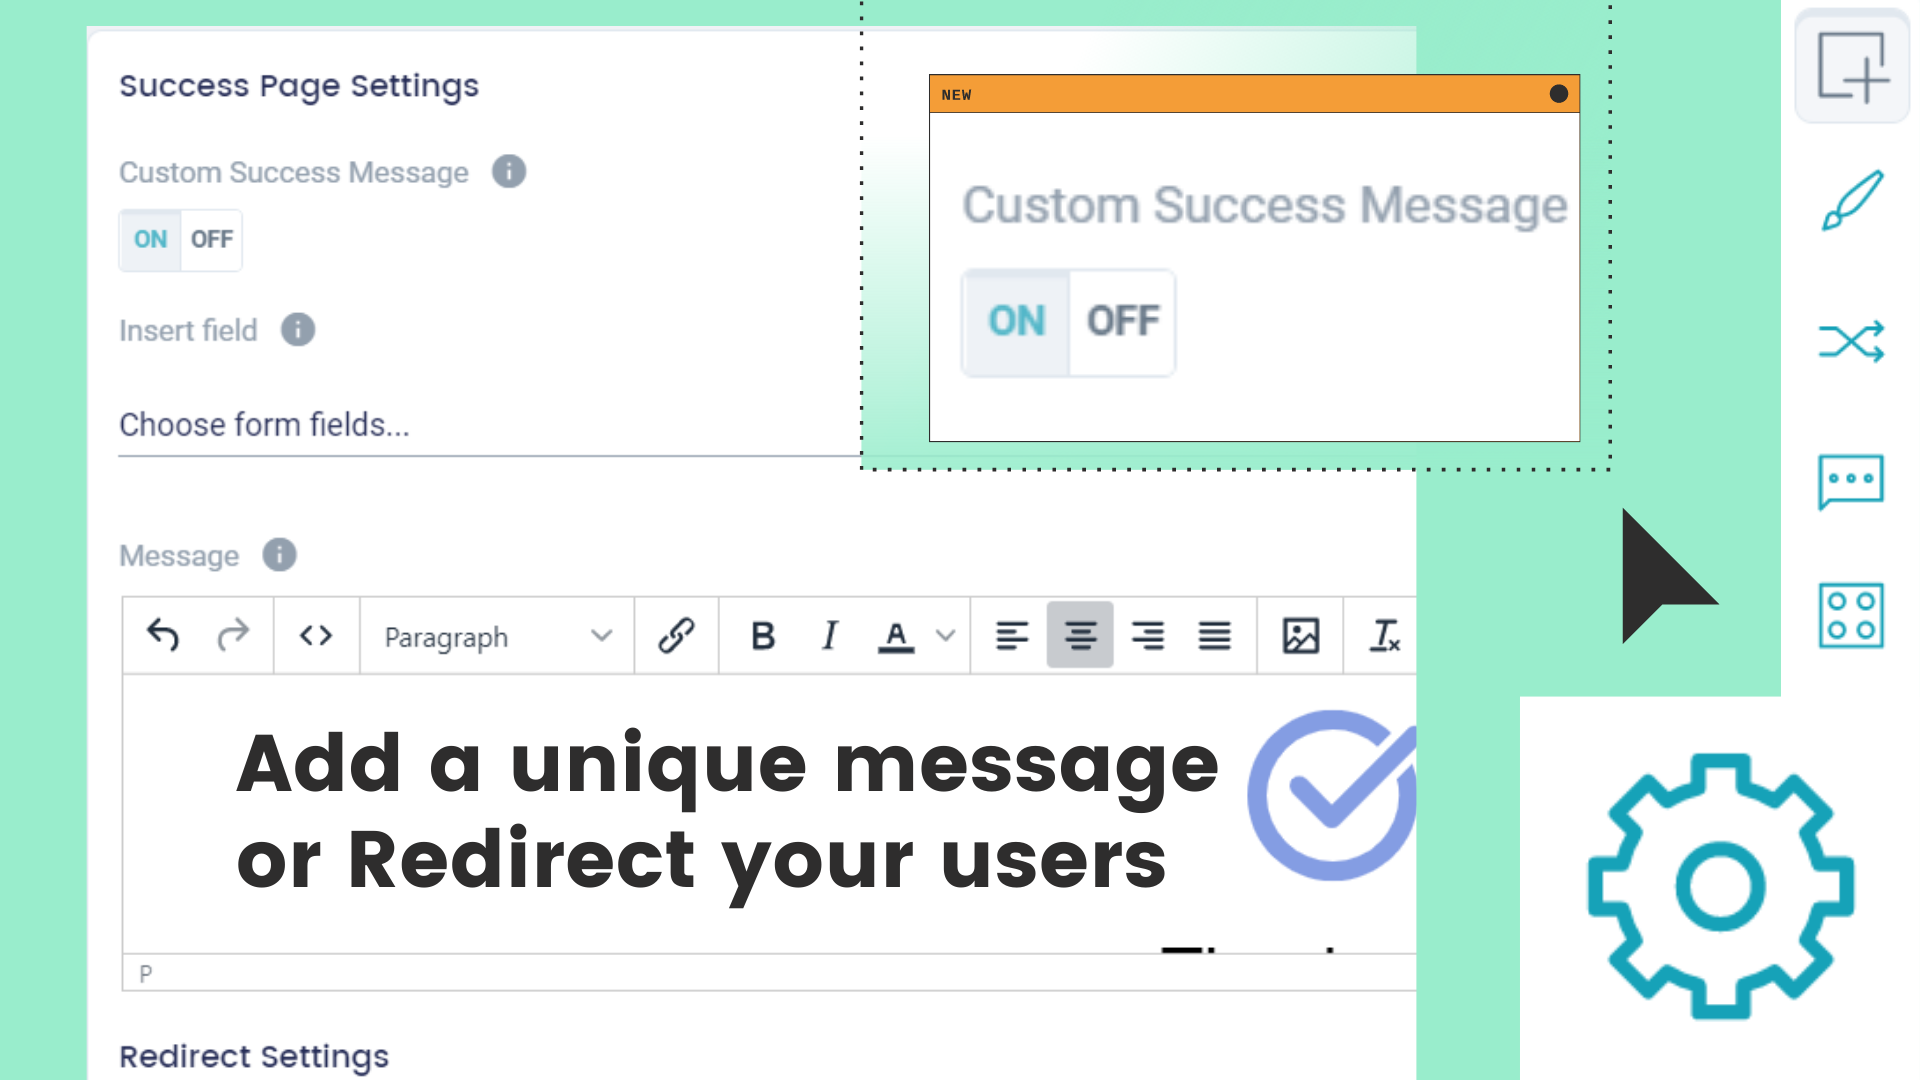
Still, on this page, you can set up redirecting your visitors to another website page automatically after they’re done submitting your form. Simply type in or copy and paste the link address on Redirect Settings. When you’re done, just click the Save red button at the bottom to save these autoresponder settings.
8.3. Another nice feature is the automatic notifications that you can enable to be sent via email or SMS to yourself or to another team member in order to alert about a new submission. Click on Notifications tab on the Settings page and then click on Add Notification.

8.4. A notification setup box will pop up so you can define your notification message. You can repeat this process and add as many notifications as you need.
Step 9. Integrations Setup
You can view your submissions from the MightyForms dashboard or redirect them to your email. But submission information from contact forms can become powerful data analysis when integrated into other platforms. Seamless form app integrations between WordPress website and platforms like Google Drive and Dropbox is easily enabled through MightyForms.
9.1. Click on the Integrations icon located on the very far left side menu to see all the native apps in which your contact form workflow can be integrated and automated. Click on Connect to log in on the desired platform and to enable its integration.

Furthermore, you can integrate your MightyForms contact form to a hundred apps more through Zapier integration.
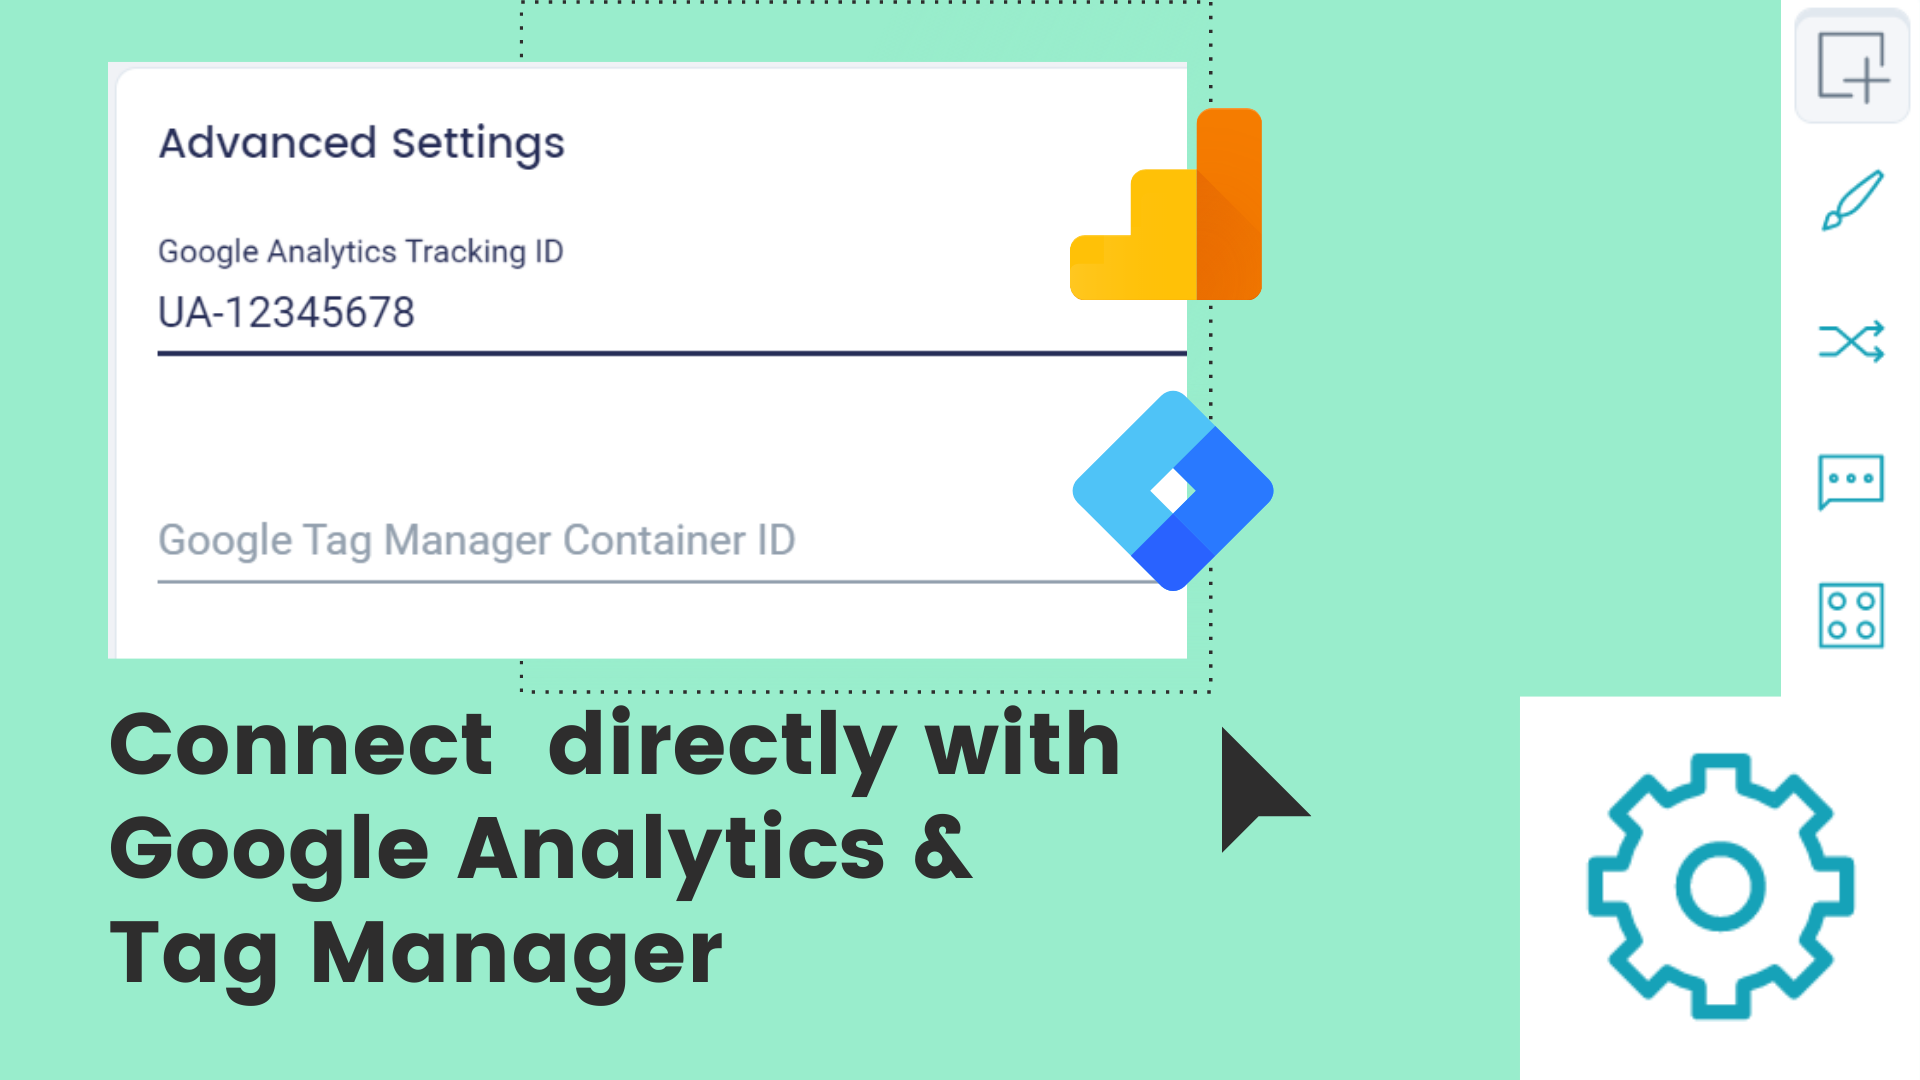
Step 10. Contact Form Analytics
MightyForms makes online performance analysis even easier with direct integration to platforms like Google Analytics and Google Tag Manager. Track your contact form traffic and measure its ROI to help you grow your business and increase lead submissions.
10.1. Click on the Settings icon on left side menu then scroll down to see the Advanced Settings options. Simply type in your Google Analytics Tracking ID and your Google Tag Manager Container ID.
Contact Form Preview and Publish – Final Steps
Ladies and gentlemen, you now have a fully responsive, automated, and integrated contact form for your WordPress website. You can even preview it to see how it looks and to test all functionalities from different devices. Keep in mind that you can go back and edit your contact form anytime until satisfied.
Step 11. Preview your contact form
11.1. Click on the Preview tab on the top right-hand corner of the MightyForms dashboard.
11.2. From the Preview page, click on Desktop, Tablet and Mobile tabs on top to preview and test how your contact form performs from all devices. You can test how your submissions work here and then find the results in the submission section under the “Test” tab from the main Dashboard.
11.3. If you would like to share this contact form with another team member or if you need to get a client’s approval before publishing it, click on the Share icon at the top right-hand corner.
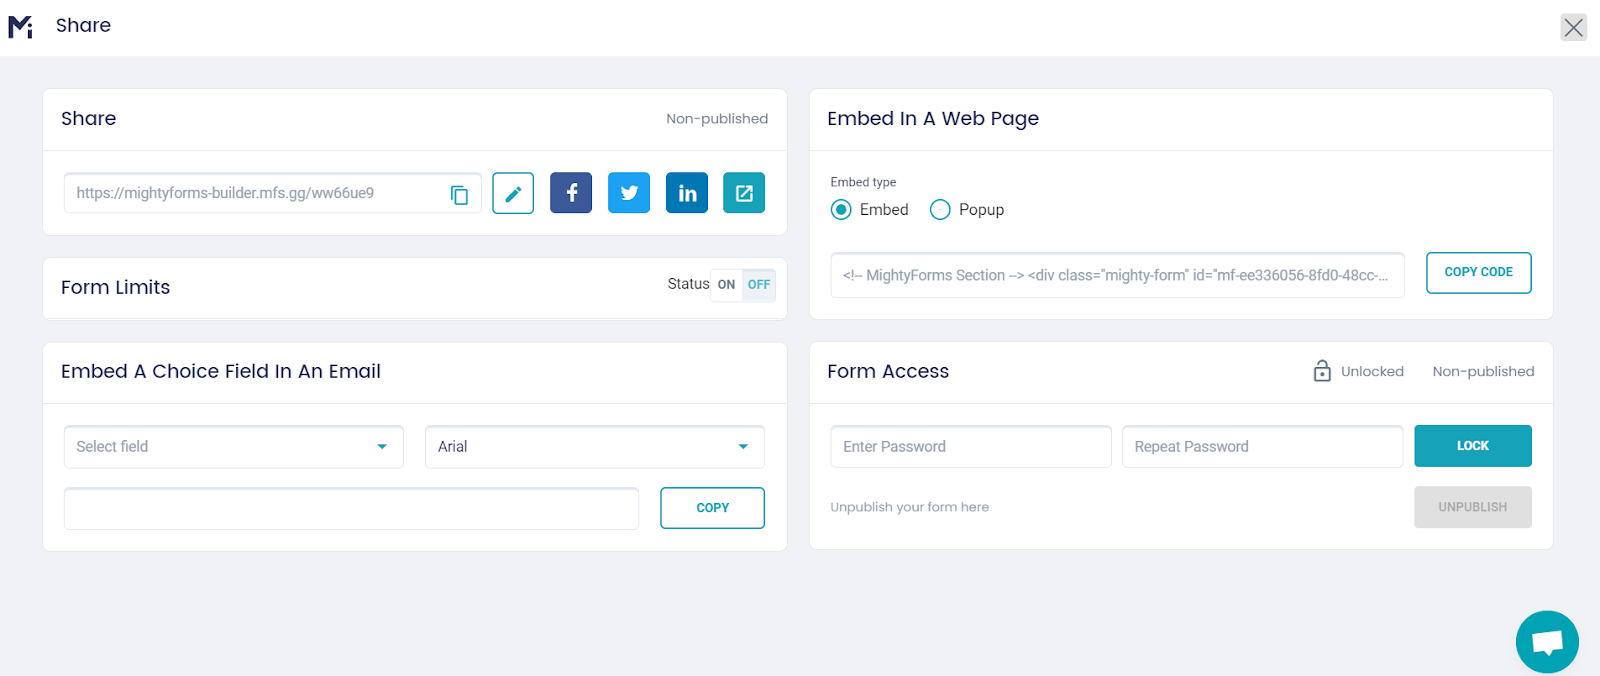
Step 12. Save & Publish
When you’re ready and good to go, save your project and publish your contact form into your WordPress website.
12.1. You must name your project so your work can be easily identified later on MightyForms main editor dashboard. Under Project Name at the top left-hand corner, type in a name for your newly created contact form. Your contact form name will be automatically updated.
12.2. From either the Builder or Design pages, click on Save & Publish tab at the top right-hand corner.
12.3. Once your contact form is done and saved, click on My Forms tab on your WordPress sidebar menu on your far left. You’ll be taken to a list of forms created and their shortcodes.
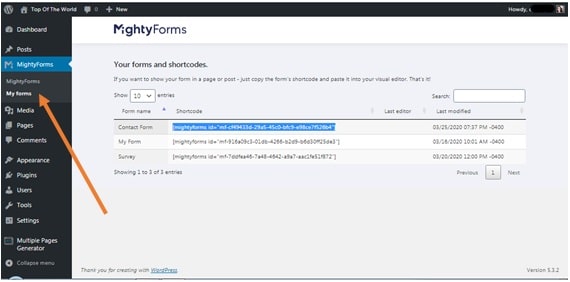
12.4. You can either copy the shortcode on your MightyForms list and paste it on your WordPress post or create a new block on your post and then click on the MightyForms icon to select your newly created contact form from the dropdown menu.

At the top right-hand corner, click on Preview, so you can preview your MightyForms contact form in your WordPress website on another window. Once you find everything is in order, click on Publish. It’s now official: your MightyForms contact form is published and active online!
WordPress Contact Form Templates Suggestions
Building your own contact form with MightyForms is no big deal, as you just saw. However, if you need a contact form presto, then MightyForms has free contact form templates that will get you going in no time.
Just follow the initial steps from the tutorial above to create a new form and then choose to build one From Template. In the sidebar on your left, you can filter MightyForms templates by type. When you filter templates by Contact Form, you’ll be shown a list of pre-made optimized templates designed for high performance:
Contact Us Form Template
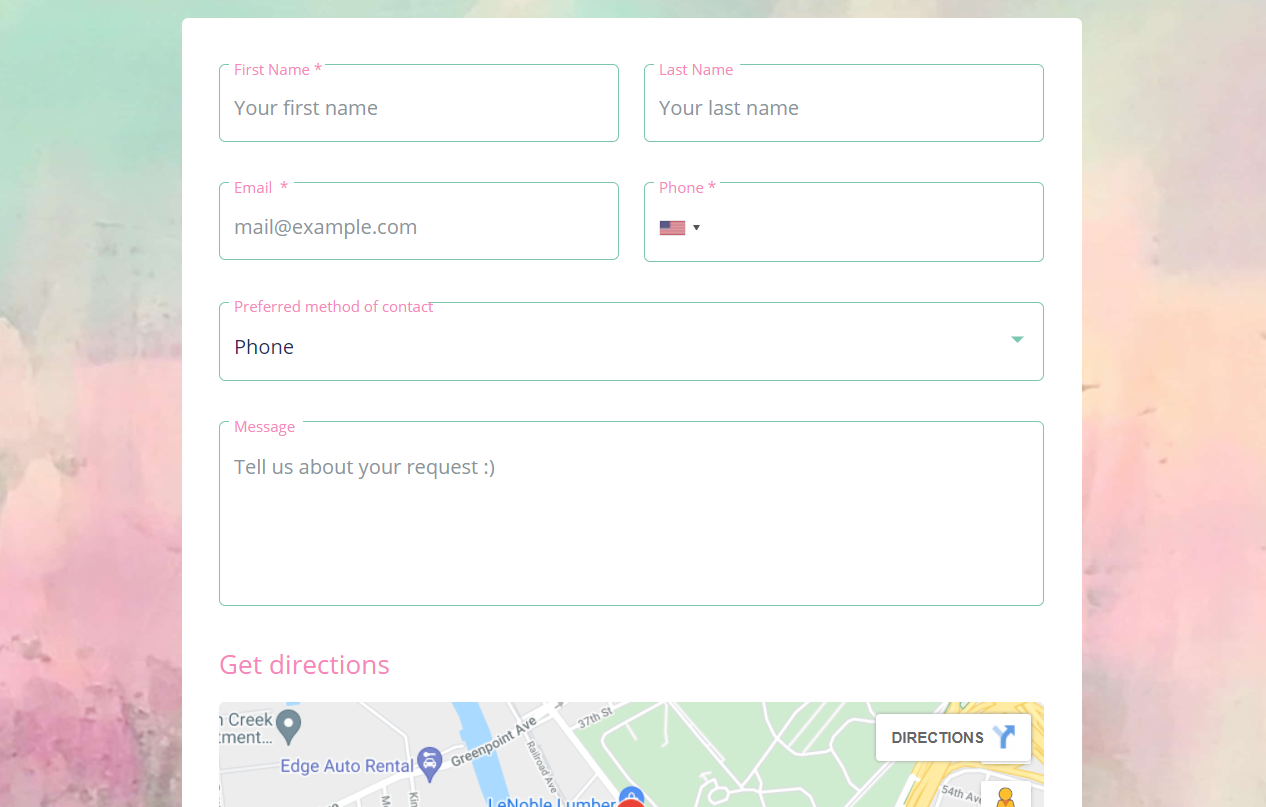
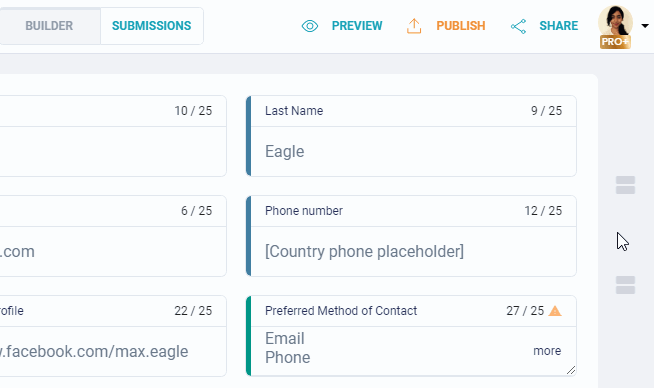
This contact form template is simple, straightforward and effective. With a clean design, you’ll be able to gather essential information from your visitors with the following fields: First Name; Last Name; Email Address; Phone Number; Preferred Method of Contact (dropdown menu with Phone or Email as options), and a Message box.
To make the interaction even more transparent and trustworthy, the Simple Contact Form template already has a Google Maps field set up, so you can make your location available to your visitors.
Contact Form Detailed
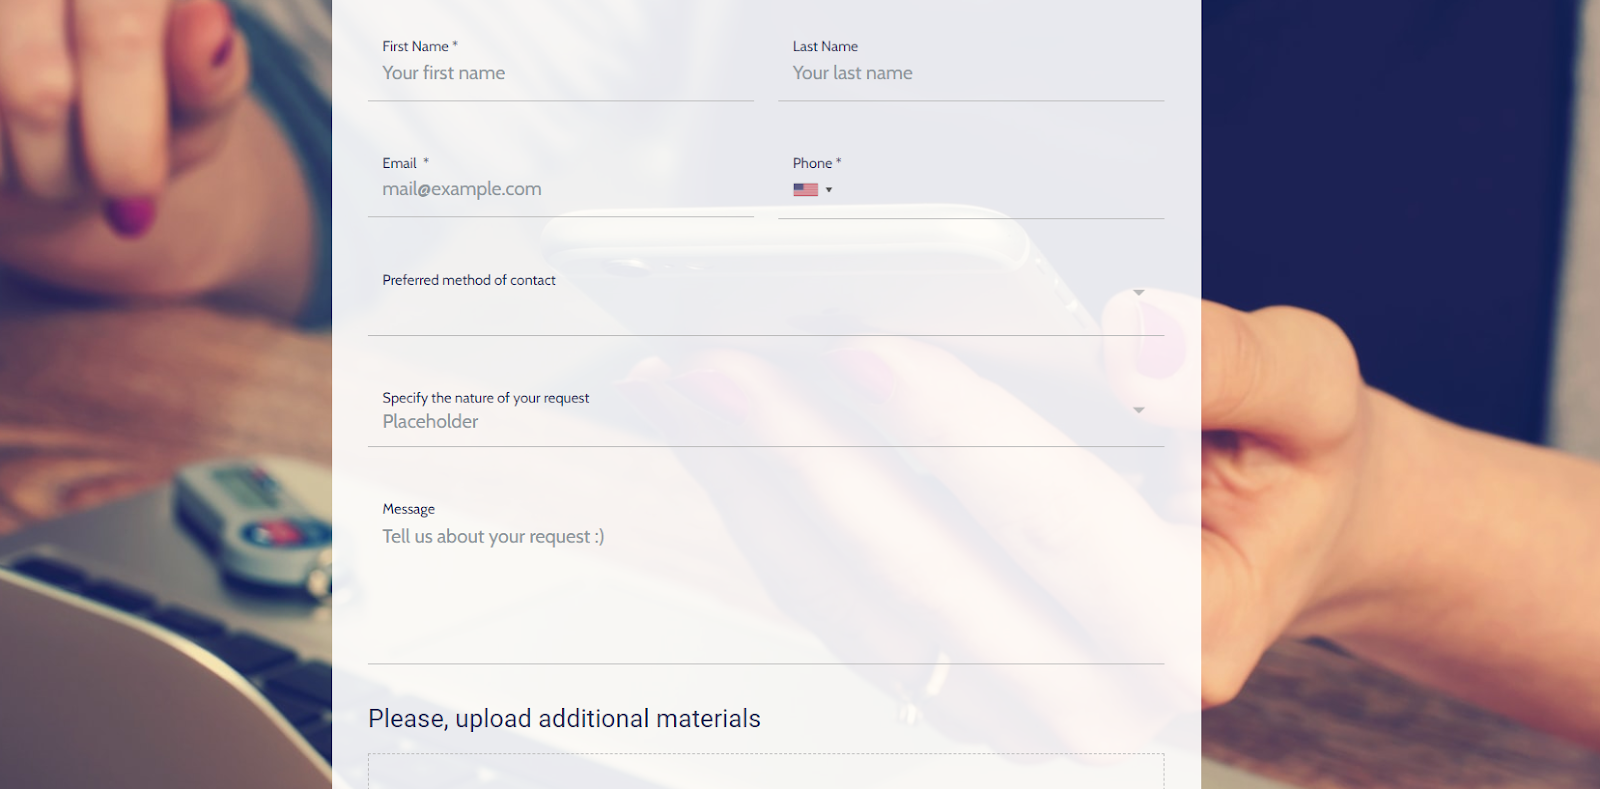
If you need to gather detailed information from each submission, then the Contact Form Detailed template will help you. Visitors will be asked to fill out the following fields: First Name, Last Name, Email Address; Phone Number; Preferred Method of Contact (dropdown menu with Phone or Email as options); Message box, and a Specify the Nature of your Request.
This last field can be totally customized to suit your needs, with a dropdown menu with options so visitors can choose the reason why they are reaching out to you. For example, you can have the following options listed as the nature of the request: Broken Item, Consulting Request, Compliance for Service, and Positive Note.
This MightyForms template suggestion is great for e-commerce websites, so you’ll know in advance what is the reason for inquiry. Having the visitor to fill out the nature of the request will allow you to determine which submissions require an urgent callback.
There you have it, a complete step-by-step tutorial to guide your contact form building with MightyForms plugin in WordPress. Your WordPress website will be easily reachable by visitors and you won’t miss any sale prospect. Start for free with MightyForms form builder, and be in control and on top of every contact form submission to leverage your lead generation and grow your business!
